
These days, when load times and web core vitals are more important than ever, serving images in WebP format seems like a no-brainer.
Making images smaller in size, speeds up your website and saves on bandwidth.
WebP files are typically up to 25-35% smaller than JPG and PNG, without losing in image quality.
But how does one get started? We’ll explain all about it in this blog post!
1. What is WebP and why use it?
WebP was developed by Google in an effort to make the web faster. It’s meant to be used as a replacement for JPG, PNG.
The total file size of the average websites consists of about 50% images, so reducing file size of your images can have a big impact on the overall load time as well as scores such as web core vitals.
Google thinks that the benefit of using WebP is so significant that they even suggest using WebP when testing one’s website using their PageSpeed Insights tool.

WebP allows for both lossless and “lossy” compression of images.
Lossless conversion of course means that there will be no loss of image quality whatsoever. However, even the lossy compression using WebP offers virtually no visual difference in terms of image quality, as can be seen in this sample gallery provided by Google.
2. WebP vs JPG: a quick and simple comparison
We also did a simple test ourselves and uploaded 10 different images to a demo page.
The combined size of all images uploaded in JPG format was 4.0MB, as seen below:
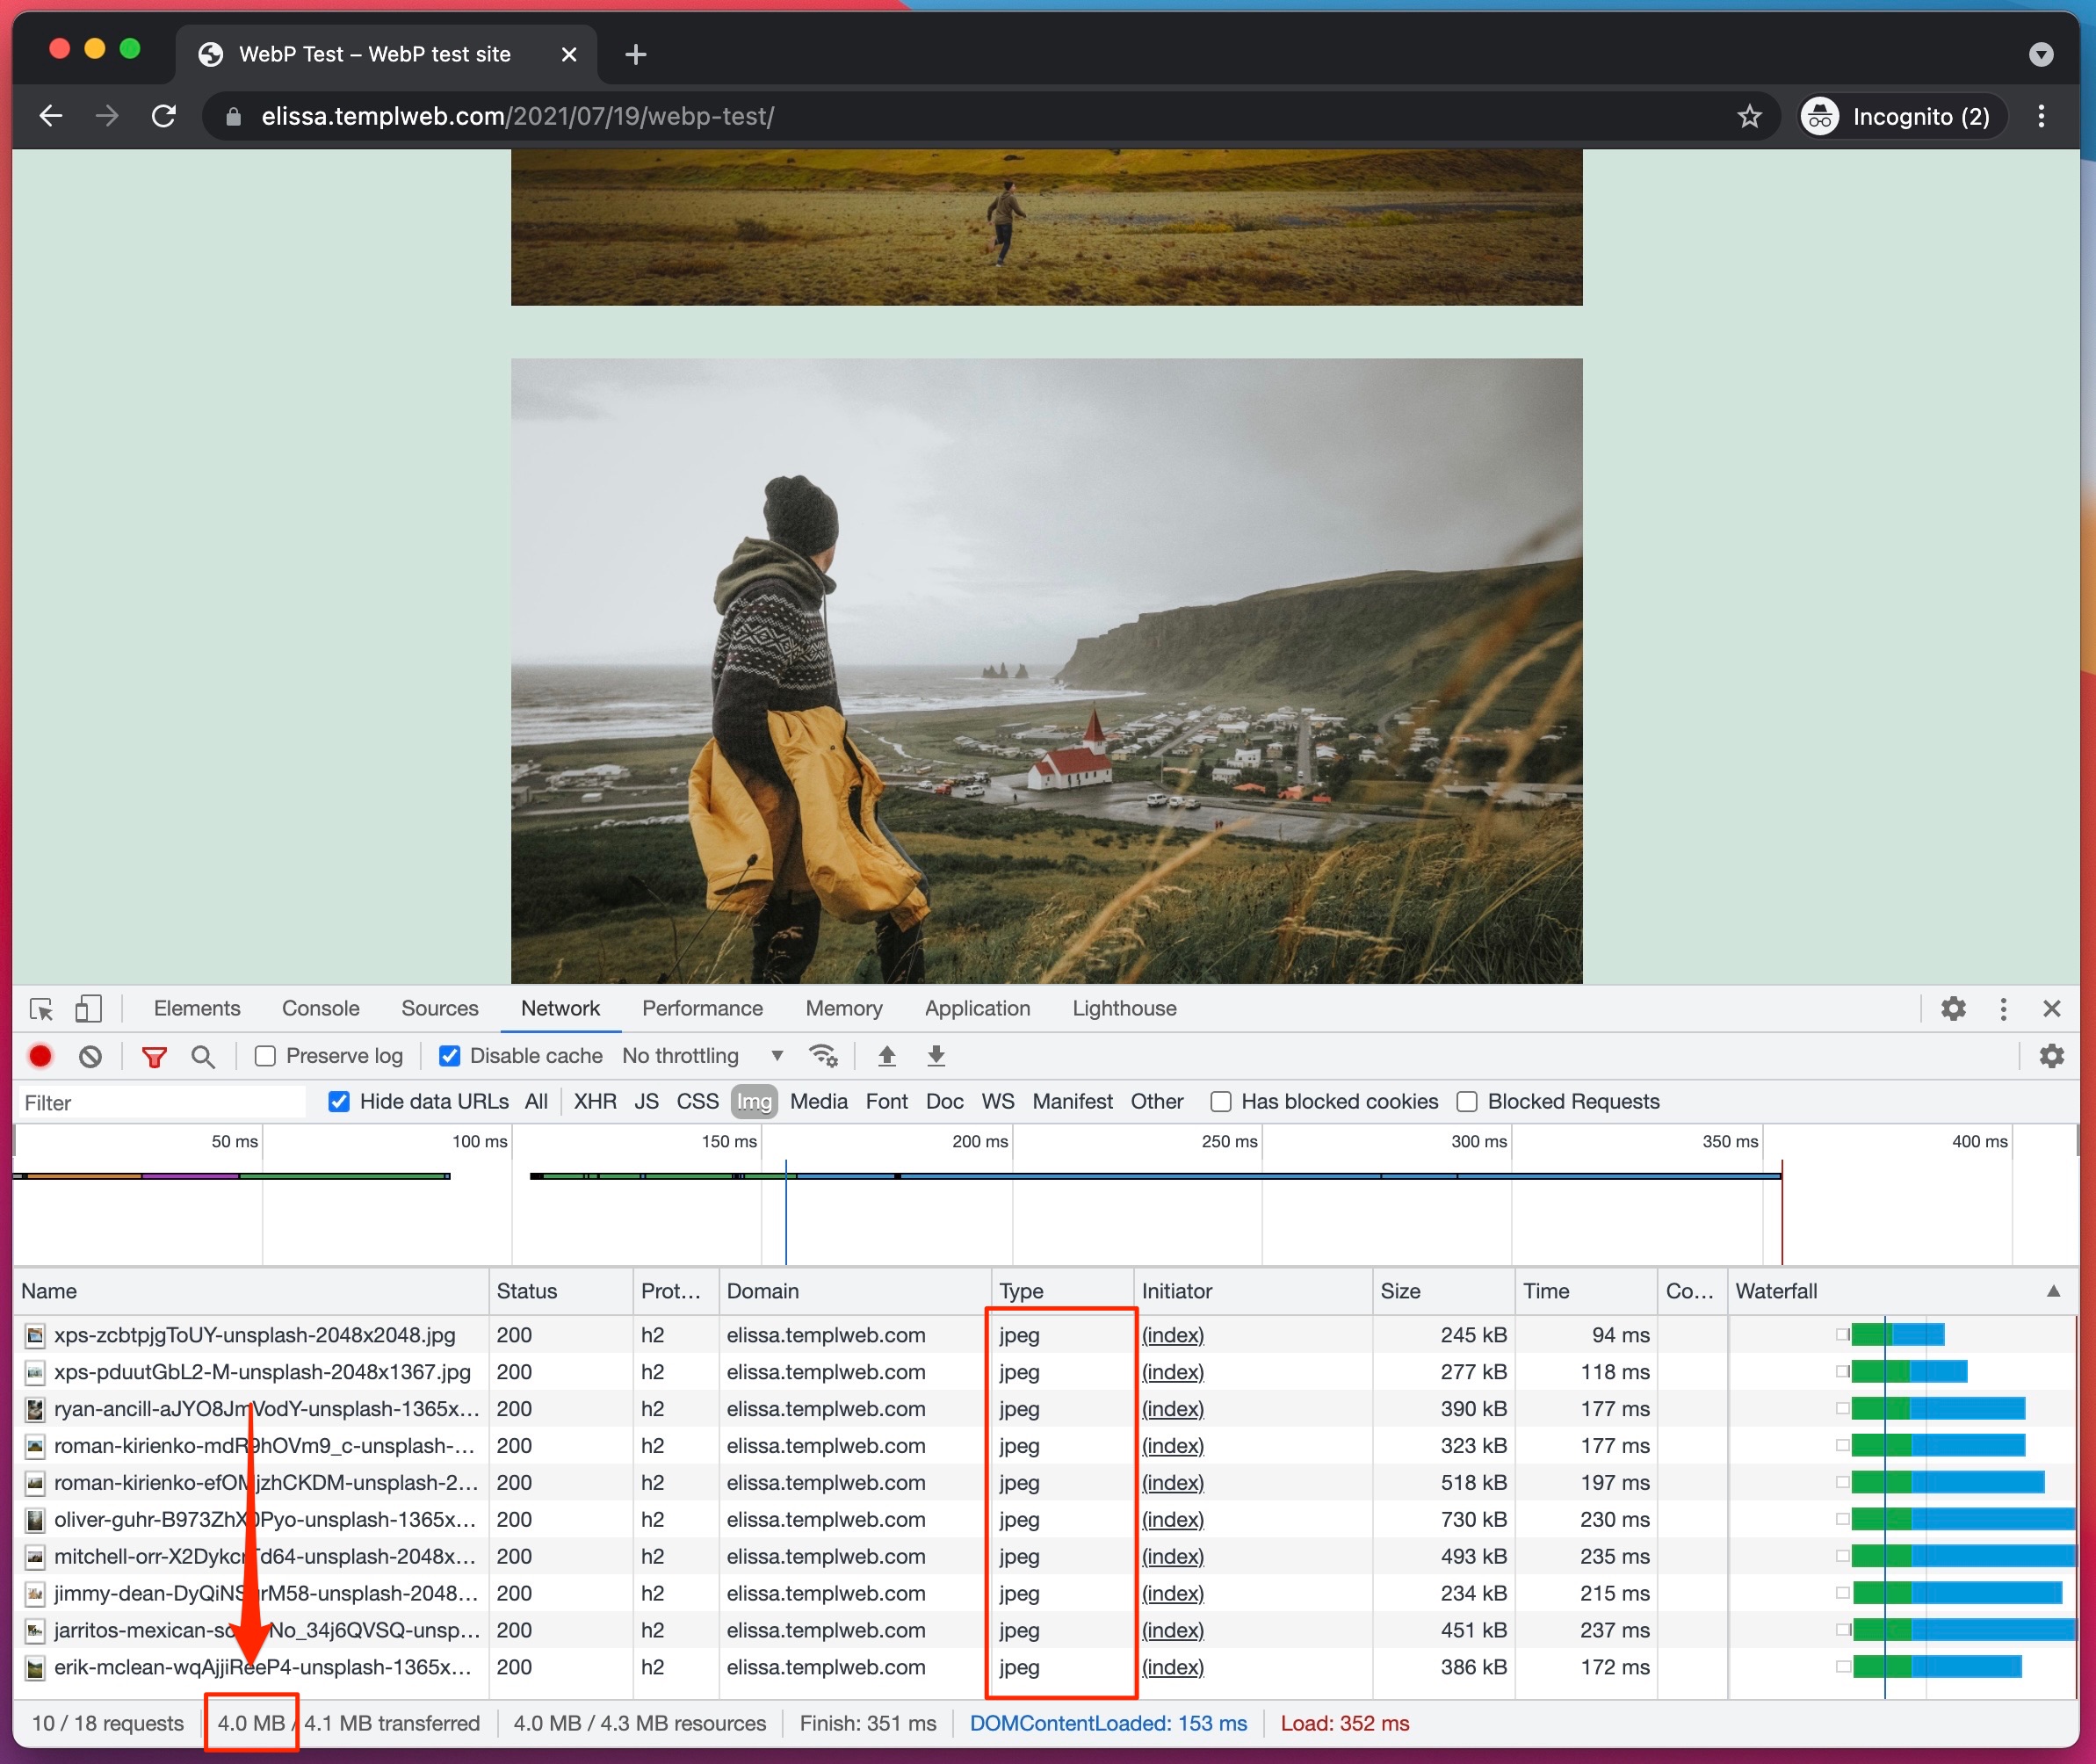
After converting all images to WebP using a lossy conversion, the combined size of all images was a mere 2.0MB.

That’s a 50% reduction in size, and we could see no difference in image quality whatsoever!
3. About WordPress native WebP support
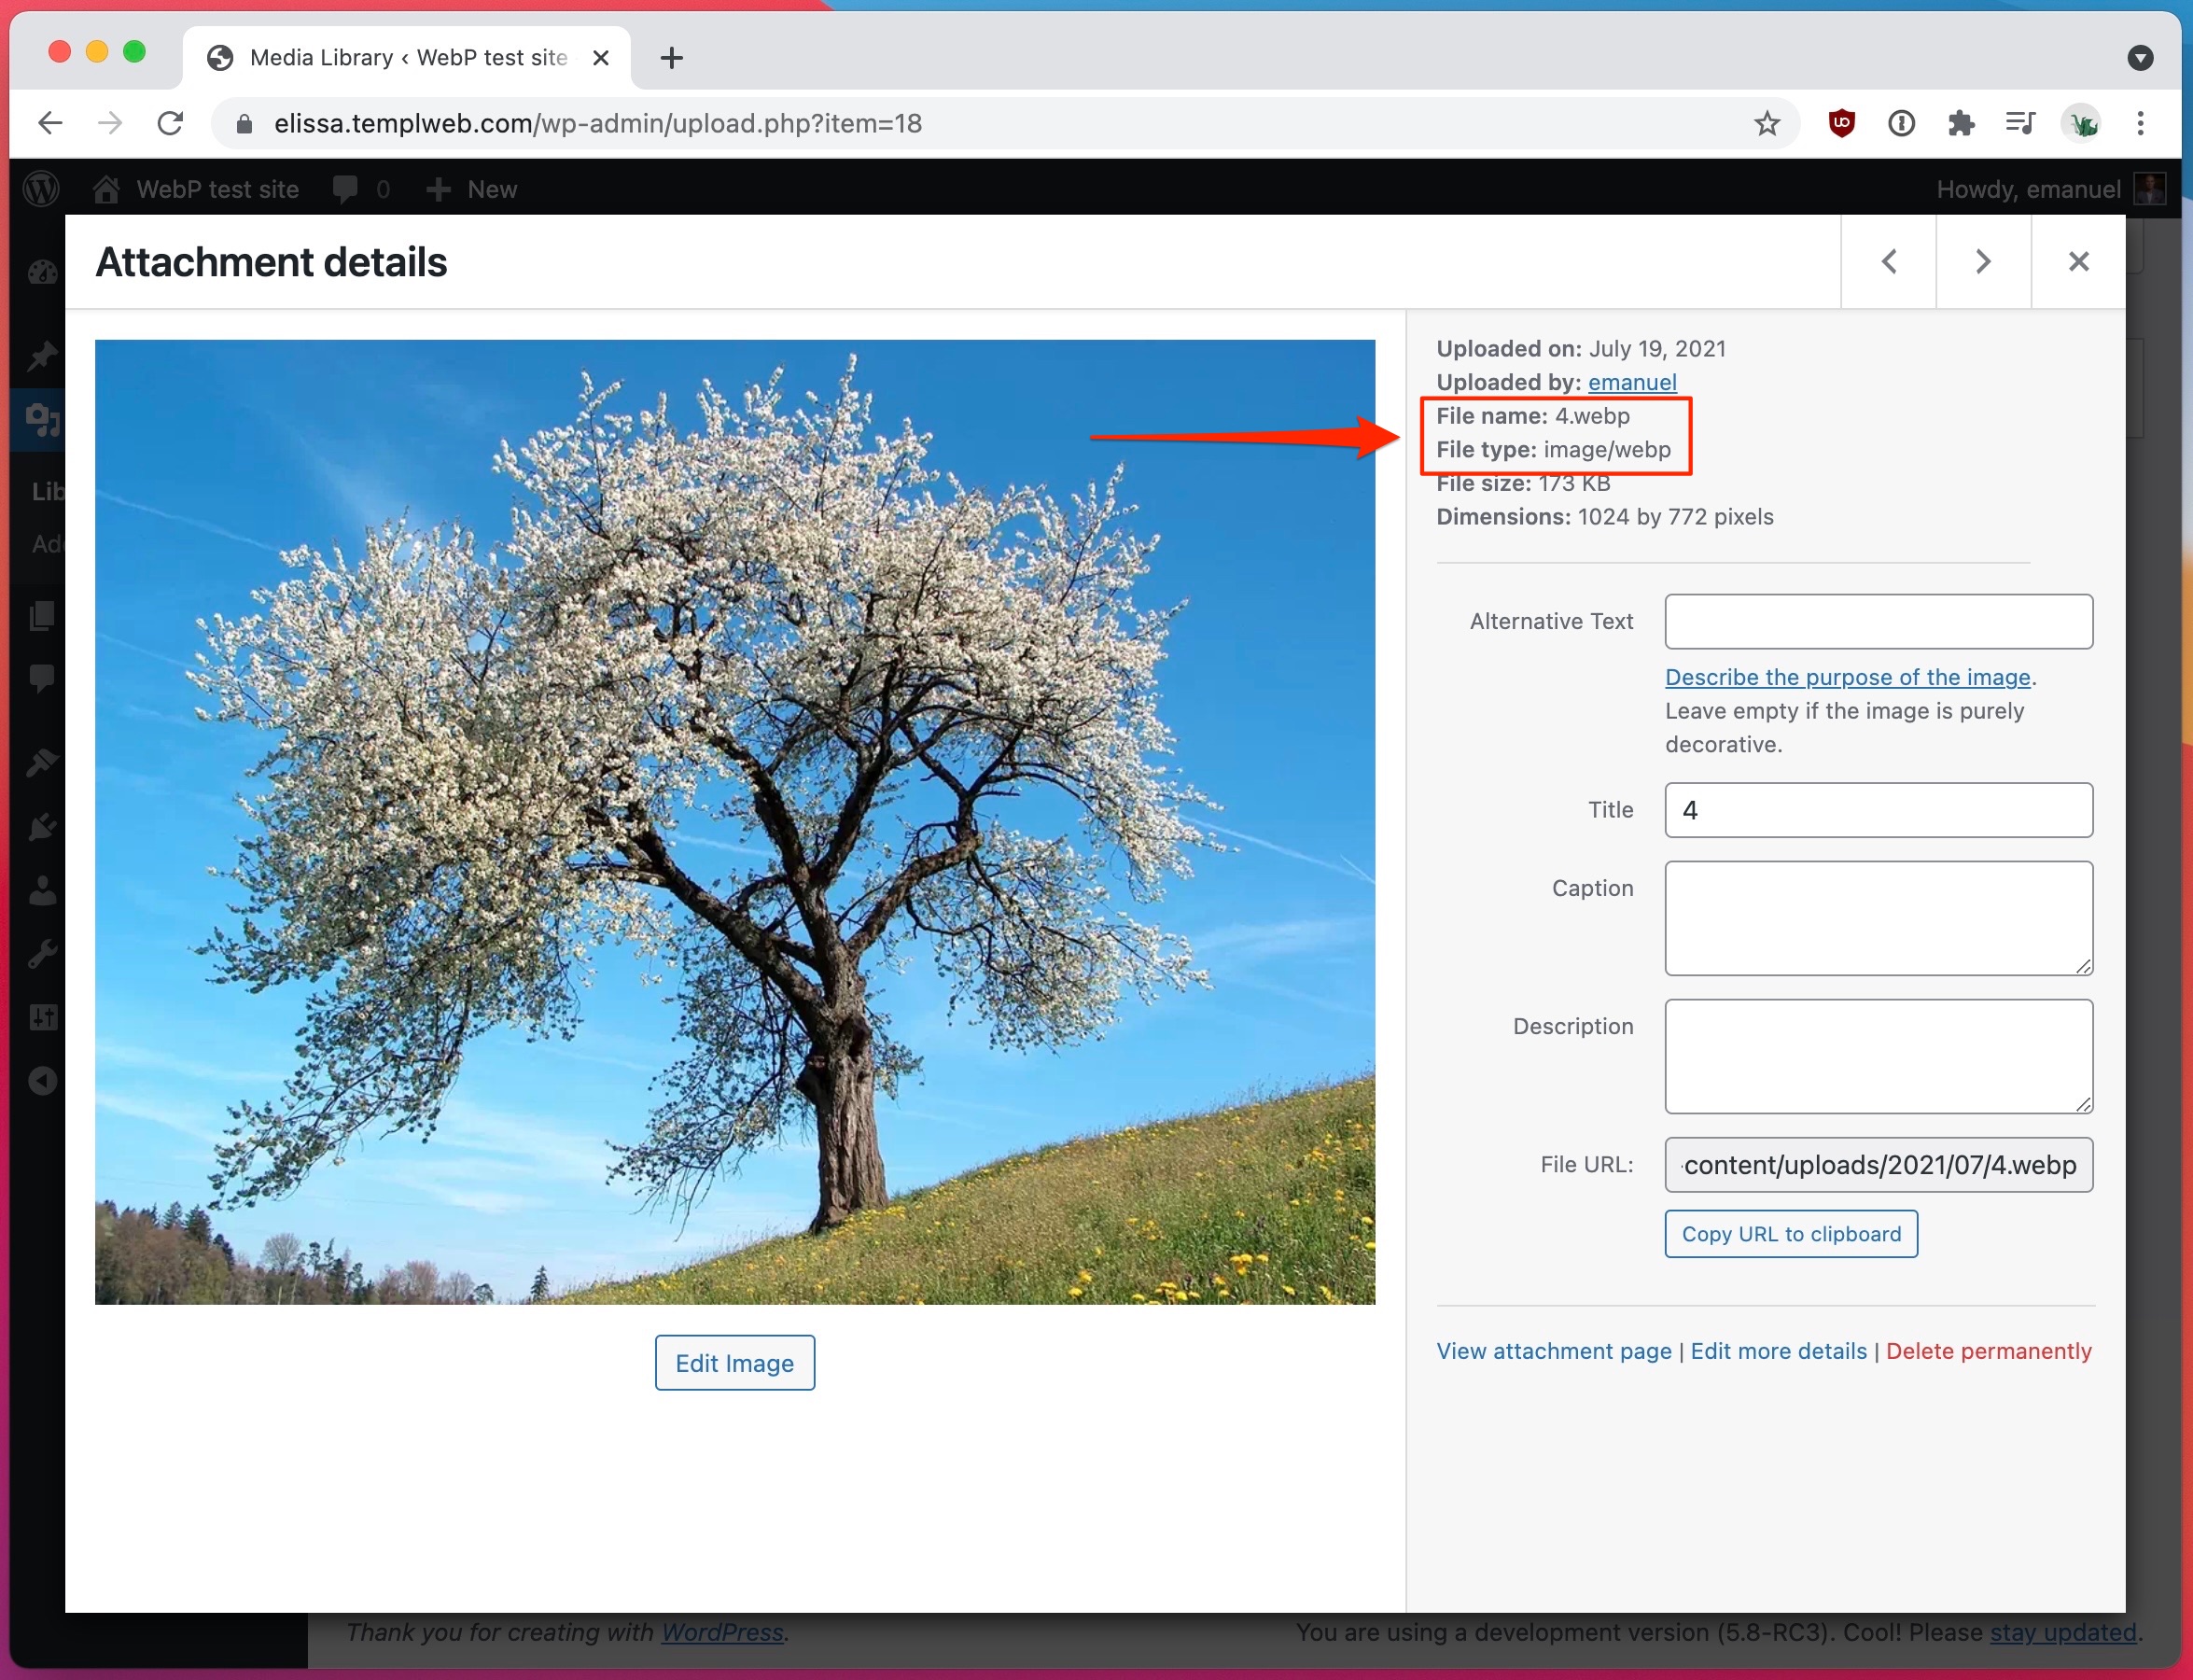
Since WordPress 5.8, there is native support for WebP built-in to WordPress itself.
To use it, one can simply upload images in WebP format to the media library, just like with the more traditional image formats.
This approach requires you to convert your images to WebP prior to uploading them to WP. To do that, there are several handy conversion tools available online.
It’s that simple to use WordPress built-in support and start uploading WebP to your site.
One should note however that browser support for WebP is still not 100%, so as of today we would recommend to make sure you have a fallback in place.
4. Serving WebP with fallback
WebP is a rather new file format and although it’s today supported by all major browsers, visitors using older browser versions won’t be able to see WebP images, unless we use a fallback. For an up-to-date overlook at the browser support for WebP, please take a look at caniuse.com.
For better backwards compatibility and to be able to support visitors using older browsers, we would recommend uploading your images to WordPress in JPG and PNG format, like you normally would, and later convert them to WebP after uploading.
Even though WebP is now natively supported by WordPress, browser support is still at ~95%. For now we would still recommend the conversion approach since it allows for a fallback for visitors with older browsers.
By doing this, your site can serve images “dynamically” and only serve WebP images to visitors who support it, and fall back to the original PNG/JPG version for visitors with older browsers.
All the popular WebP plugins (including the ones listed below) has this fallback feature built-in, and is easy to configure.
5. Serving WebP in WordPress using a plugin
For most WordPress site owners, the easiest way to convert all images to WebP and start serving them to your visitors, will be to use one of many of the available plugins for this.
There are several plugins available for WordPress that let you convert all your JPG and PNG to WebP, some are free and some paid options exists as well.
Some of the most popular options are:
- WebP Express (Free and unlimited)
- Imagify (Freemium model, 20MB of images can be converted for free every month)
- ShortPixel (Freemium model, 100 images per month can be converted for free)
- Smush (WebP conversion only available in the paid “Pro” version)

Please note that besides converting your images to the WebP file format, you will also have to configure your web server in order to serve them to your visitors.
For Apache environments, your .htaccess file should be updated automatically and it should work out-of-the-box. For nginx hosting environments, manual configuration is needed, so you may have to ask your host to help out. Here on Templ, this service is of course included for free as a part of our managed hosting.
Using a plugin is for the most part easy and straightforward, but using a plugin has its drawbacks since installing additional plugins on your site means that more code needs to be run on each page load, which slows down the site, and conversion to WebP through PHP is not exactly ideal.
6. Serving images in WordPress WITHOUT plugin
Ideally then, we would want to serve images in WebP format without relying on a plugin for WordPress to make it happen.
This would give us the best of both world; we would be able to serve WebP and speed up our website, and wouldn’t have to add more code to our website and thus slowing down the backend.
If you are hosting your website on a VPS or have other non-managed hosting for yours site however, this is rather technical to do and you would likely have to do it all by yourself. A good starting point in those cases would be the official documentation on how to convert images on different operating system.
If you are using a managed hosting provider on the other hand, your host just might be able to help you out and setup this for you.
Here on Templ for example, we offer conversion of images to WebP, including all the necessary server configuration, all included for free with all our plans.
7. Summary
All in all, it’s clear to say that the benefit of using WebP on your site can be significant and when using fallbacks we don’t see any drawbacks either.
There is a good reason Google’s PageSpeed Insights recommends you to “serve images in next-gen formats”.
We would recommend anyone to start looking into WebP conversion and start using it on your website as soon as possible.
If you have any questions about WordPress and WebP images then you are welcome to ask us in the chat here on this page or to post in the comment box below.
Good luck! 🙂