Why Templ.io Supports QUIC & Why Your Web Host Should Too

First we had HTTP.

Then HTTP/2 came along and brought new features and speed improvements to the world wide web.

Now, there’s QUIC which is yet another major leap in performance as well as security, and it’s a candidate to replace HTTP/2 and become HTTP/3.

QUIC is a next generation internet protocol that is encrypted-by-default and can decrease website load times considerably, especially for mobile devices and for low bandwidth connections.

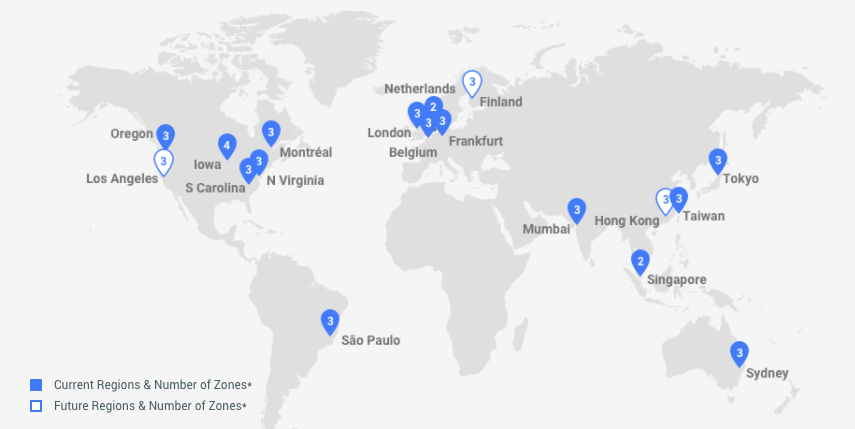
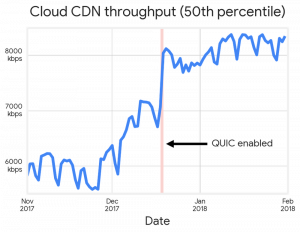
Templ.io has enabled QUIC for all our customers

At Templ.io we have already enabled QUIC for all our customer using our free of charge Google Cloud based CDN and we’re already seeing improvements on our customers’ website load times.

QUIC is an initiative by Google (as HTTP/2 was as well) and brings several major improvements:

  • Dramatically reduced connection-establishment time
  • Multiplexing without head-of-line blocking
  • Improved congestion control
  • Connection migration

Dramatically reduced connection-establishment time

HTTP/2 typically requires 2-3 roundtrip of handshakes between web browser and server for every visit before a secure connection has been established.

With QUIC on the other hand, a server can send data to a web browser without the need of a single roundtrip if they have communicated before, which can dramatically reduce the “time to first byte” or TTFB which is often measured by tools like Pingdom or Webpagetest.org.

HTTP/2 vs QUIC. Source: Google

Non-blocking loss of single packets (a.k.a “Multiplexing without head-of-line blocking”)

HTTP/2 enabled multiple streams of data in one connection, but all of its streams of data can be blocked when a single TCP packet is lost—a problem called head-of-line blocking.

QUIC, just like HTTP/2, allows for multiple streams of data in one connection but uses a more redundant way to transfer data using UDP instead of TCP. With QUIC, a loss of a single data packet won’t slow down other requests than those contained within that packet.

Improved congestion control

Congestion control is a very complex subject and I won’t dig deeper into that in this blog post. Here is a very brief summary of QUIC’s congestion control ambition from Wikipedia:

QUIC’s secondary goals include reduced connection and transport latency, and bandwidth estimation in each direction to avoid congestion.

Connection migration, from WiFi to cellular and back

QUIC was very much created with a mobile-first way of thinking and supports migration of connections from WiFi to Cellular and back.

Never again will your website stop loading completely just because your phone lost its WiFi connection for a moment.

How Much Faster?

On a well-optimized site like Google Search, connections are often pre-established, so QUIC’s faster connections can only speed up some requests—but QUIC still improves mean page load time by 8% globally, and up to 13% in regions where latency is higher.

Source: Google
Google Cloud CDN throughput after enabling QUIC. Source: Google

How To Check If Your Website Is Currently Using QUIC?

To check if your current website is being served using QUIC or not you can open up the Developer Tools panel in your web browser and go to the Network tab and look for QUIC in the Protocol column.

Check if your site is utilizing QUIC or not

If you see several rows mentioning QUIC then voilà, you’re already using QUIC and are ready to blaze pass your competition! ?

Are you already using QUIC today or are you looking to start using it?

Let us know in the comments below!

Sources:
https://cloud.google.com/blog/products/gcp/introducing-quic-support-https-load-balancing
https://www.litespeedtech.com/products/litespeed-web-server/features/quic-support/why-use-quic
https://blog.cloudflare.com/the-road-to-quic/

How to use Templ.io Backups like a Pro

Daily backups of your website is a total must in today’s day and age. You don’t want to be without a full website backup if disaster strikes. That should be a common rule of thumb by anyone that owns a website. You HAVE to make sure that your web host is providing daily backups of your website, and an option to create backups manually.

In this blog post, I will talk about what kind of backups we have at Templ.io, and how you can use them like a pro, but first things first.

What are local backups?
Local backups are backups that you’ve created manually. They are stored locally on the same server as the website, and will count as towards your disk space usage.

What are remote backups?
Remote backups are done automatically for all websites hosted on Templ.io, but can also be created manually. Remote backups are stored on a separate server and do not count towards your disk space usage. Remote backups are created daily for each website that is hosted with Templ.io, and each remote backup is saved for 30 days.

  • Note: The timestamp of all backups are in your local time zone.

How to use backups like a Pro
If you have more than one website hosted with Templ.io, then I have some good news for you. You can easily create a WordPress website as a “template” and then restore that backup/template to any new website you set up with us.

Say for example that you’re a web agency, and you frequently set up new WordPress sites with a default set of your own favorite plugins, themes and settings. Instead of installing every plugin each time you set up a new WordPress site, you can instead do it one time, and then create a Templ.io backup of that website and use it as a template.

Here are the steps listed in an easy to understand way:

  1. Create a WordPress site in the Templ.io Panel and configure it how you want it. Lets call this website “Template Website”.
  2. Create a backup file of “Template Website”.
  3. Create a new WordPress website in the Templ.io panel, for the sake of ease, let’s call this website “Client Website 1”.

With these steps, you can easily restore the backup of “Template Website” to “Client Website 1” with a single click in the Templ.io Panel and thus save a lot of time. Of course this applies to future websites such as “Client Website 2.. 3.. 4..” and so on.

Related help links:

If you have any questions regarding our backups, or if you have any suggestions to us, feel free to leave a comment below!

New Data Center Location: Los Angeles, USA

Google’s long awaited seventeenth Google Cloud Platform region located in Los Angeles, is now open and thus also available in the Templ.io Control Panel.

Hosting WordPress websites in the new region can significantly improve latency for end users in Southern California, and by up to 80% across Northern California and the Southwest, compared to hosting them in the previously closest region, Oregon. You can visit www.gcping.com to see how fast the LA region is for you.


Paul-Henri Ferrand, President of Global Customer Operations, officially announces the opening of Google’s Los Angeles cloud region.


Except for the new Los Angeles region, we also have these locations to choose from right now:

  • Oregon, USA
  • South Carolina, USA
  • North Virginia, USA
  • Iowa, USA
  • London, UK
  • Frankfurt, Germany
  • St. Ghislain, Belgium
  • São Paulo, Brazil
  • Tokyo, Japan
  • Mumbai, India
  • Changhua County, Taiwan
  • Singapore
  • Sydney, Australia
  • Montréal, Canada
  • Eemshaven, Netherlands
  • Hamina, Finland


How to set up a WordPress site or WooCommerce store in Los Angeles

Here are the simple steps to get started and set up a website in Los Angeles, USA:

  1. Sign up for a free 10-day templ.io trial account
  2. Activate your account with the verification link that was sent to your email inbox and log in to the Templ.io Panel
  3. Click Create Website
  4. Name your website and select Los Angeles in the location list

Create a WordPress site on GCP Los Angeles

Click Continue and wait for the setup to finish. Once the process is done, you will be able to access your new WordPress site right away with an URL provided by us. You can also copy an existing WordPress site and migrate it to templ.io to compare the speed of your old host, to do that, please check our migration guide or contact us if you want us to do for you (for free).


Future Google Cloud Platform regions to be launched: Hong Kong.

New Data Center Location: Hamina, Finland

Google’s sixteenth Google Cloud Platform region located in Finland, is now open and thus also available in the Templ.io Control Panel.

The new Finland region, joins the Netherlands, Belgium, London, and Frankfurt in Europe and makes it easier to launch a super faster WordPress website using resources across those geographies. Hosting WordPress websites in the new region can improve latencies by up to 65% for end-users in the Nordics and by up to 88% for end-users in Eastern Europe, compared to hosting them in the previously closest region. You can visit www.gcping.com to see for yourself how fast the Finland region is from your location.

Google Cloud Finland

We have already set up websites in Finland for our customers in Sweden and seen tremendous speed impacts. After we moved one website from Netherlands to Finland, the load time was reduced with 0.5 seconds and the website was fully loaded in 750ms (measured from Stockholm, Sweden).

The new region is located in Google’s existing data center in Hamina, Finland. This facility is one of their most advanced and efficient data centers in the Google fleet. Google’s high-tech cooling system, which uses sea water from the Gulf of Finland, reduces energy use and is the first of its kind anywhere in the world. When you are launching a WordPress website in Finland, you are doing so with green energy!

Except for the Finland region, we also have these locations to choose from right now

  • Oregon, USA
  • South Carolina, USA
  • North Virginia, USA
  • Iowa, USA
  • London, UK
  • Frankfurt, Germany
  • St. Ghislain, Belgium
  • São Paulo, Brazil
  • Tokyo, Japan
  • Mumbai, India
  • Changhua County, Taiwan
  • Singapore
  • Sydney, Australia
  • Montréal, Canada
  • Eemshaven, Netherlands

How to set up a WordPress site or WooCommerce store in Finland
Here are the simple steps to get started and set up a website in Hamina, Finland:

  1. Sign up for a free 10-day templ.io trial account
  2. Activate your account with the verification link that was sent to your email inbox and log in to the Templ.io Panel
  3. Click Create Website
  4. Name your website and select Finland in the location list

Set up a WordPress site in Finland

Click Continue and wait for the setup to finish. Once the process is done, you will be able to access your new WordPress site right away with an URL provided by us. You can also copy an existing WordPress site and migrate it to templ.io to compare the speed of your old host, to do that, please check our migration guide or contact us if you want us to do for you (for free).


Future Google Cloud Platform regions to be launched: Los Angeles, USA & Hong Kong.

New Data Center Location: Eemshaven, Netherlands

A brand new Google Cloud Platform region has arrived, this time it’s Eemshaven, Netherlands that gets the honor of joining the GCP lineup. We always roll out new locations alongside Google Cloud Platform and we are really happy to say that the data center in Netherlands has arrived and is now available in the Templ.io Panel.

The Netherlands region is located in Google’s existing datacenter in Eemshaven. Prior to opening their datacenter two years ago, they had procured enough renewable energy on the Dutch grid to ensure consumption would be matched with 100% renewable energy from day one. This means that when you use this region to host your WordPress website, you are doing so sustainably.

Except for the Netherlands, we also have these locations to choose from right now:

  • Oregon, USA
  • South Carolina, USA
  • North Virginia, USA
  • Iowa, USA
  • London, UK
  • Frankfurt, Germany
  • St. Ghislain, Belgium
  • São Paulo, Brazil
  • Tokyo, Japan
  • Mumbai, India
  • Changhua County, Taiwan
  • Singapore
  • Sydney, Australia
  • Montréal, Canada

How to set up a WordPress site or WooCommerce store in The Netherlands

Here are the simple steps to get started and set up a website in Eemshaven, Netherlands:

  1. Sign up for a free 10-day templ.io trial account
  2. Activate your account with the verification link that was sent to your email inbox and log in to the templ.io Panel
  3. Click Create Website
  4. Name your website and select Netherlands in the location list

Click Continue and wait for the setup to finish. Once the process is done, you will be able to access your new WordPress site right away with an URL provided by us. You can also copy an existing WordPress site and migrate it to templ.io to compare the speed of your old host, to do that, please check our migration guide or contact us if you want us to do for you (for free).

Google Cloud Platform Expansion Plans

GCP Regions 2018

Above you can see the current regions available in Google Cloud Platform (blue pins) and future regions (white pins).

Google Cloud Platform will expand with new data centers in Los Angeles, Finland and Hong Kong. The expansion to Hong Kong has been confirmed by Google that it will happen this year.

New Data Center Location: Montréal, Canada

The fifteenth Google Cloud Platform region and first region in Canada has arrived and is now available in the templ.io Panel. We always roll out new locations alongside Google Cloud Platform and we are really happy to say that the data center in Montréal has arrived.

According to Google, hosting a website in the new region can improve latency by 90% for end users in Montréal, compared to hosting them in the closest region.


Except for Montréal, we also have these locations to choose from right now:

  • Oregon, USA
  • South Carolina, USA
  • North Virginia, USA
  • Iowa, USA
  • London, UK
  • Frankfurt, Germany
  • St. Ghislain, Belgium
  • São Paulo, Brazil
  • Tokyo, Japan
  • Mumbai, India
  • Changhua County, Taiwan
  • Singapore
  • Sydney, Australia
  • Eemshaven, Netherlands

How to set up a WordPress site or WooCommerce store in Montréal

Here are the simple steps to get started and set up a website in Montréal:

  1. Sign up for a free 10-day templ.io trial account
  2. Activate your account with the verification link that was sent to your email inbox and log in to the templ.io Panel
  3. Click Create Website
  4. Name your website and select Montréal in the location list

Host a WordPress site in Montreal

Click Continue and wait for the setup to finish. Once the process is done, you will be able to access your new WordPress site right away with an URL provided by us. You can also copy an existing WordPress site and migrate it to templ.io to compare the speed of your old host, to do that, please check our migration guide or contact us if you want us to do for you (for free).

Google Cloud Platform Expansion Plans

GCP Regions 2018

Above you can see the current regions available in Google Cloud Platform (blue pins) and future regions (white pins).

Google Cloud Platform will expand with new data centers in Los Angeles, Finland and Hong Kong. The expansion to Hong Kong has been confirmed by Google that it will happen this year.

How to set up a WooCommerce Store on Templ.io

Getting ready to start your eCommerce business? WooCommerce is an excellent choice, as it’s free, and one of the best eCommerce platforms out there.

This is a step by step guide on how to set up your Templ.io account and install WordPress and WooCommerce. This guide will not include any optimization or change of settings, we just show you how to set up your Templ.io account and install WooCommerce.

If you already have WooCommerce installed, we recommend checking the rest of our blog instead, these articles might be of interest:

Step 1 – Sign up for a Templ.io trial account
Sign up for a templ.io trial account here. Be sure to use a strong password!

Optional: Sign up with Facebook or Google.

Step 2 – Verify your email address

After you click “Begin My Free Trial” you need to verify your email address, to do that, open the email that you entered and look for an email from templ.io with the subject “Verify your email address”, and click the link in the email to verify your account.

Step 3 – Login to the Templ.io account you just created

After you verify your account, you will be redirected to the login page for Templ.io, enter the same details you used to create your account with to login.

If you signed up with Facebook or Google, click on the one you used to login.

Login to templ.io

Step 4 – Launch your private Google Cloud Server + Install WordPress

Think this step is difficult? It’s not ?  once you have logged into your Templ.io account for the first time, you will be greeted by this screen:

For the purpose of this guide, we will go ahead and click “Create Website Now!

Step 5 – Name your website and choose a location

Choose GCP Data Center Location

Step 6 – Wait for the setup to finish

The Templ.io Panel is now creating your Google Cloud server and installing WordPress on that server. This process may take up to 5 minutes, so please be patient.

Once the setup is done, you will be greeted by this message:

Step 7 – Access your website

When the Website creation is complete, click Continue to access your website details from the Templ.io Panel:

Installing WooCommerce

Step 1
Login to your WordPress Admin panel (wp admin) and click “Plugins” and then “Add New


Step 2
Search for WooCommerce in the search field, and then click “Install” followed by “Activate

Step 3
Upon activation, you will be greeted by the WooCommerce Setup Wizard. Once you have completed the Wizard, you have successfully installed and set up WooCommerce.

You can access the WooCommerce settings and products from the WordPress menu, as shown in the screenshot below:

New Data Center Location in Mumbai, India

Great news for our users and friends in India!

India’s Google Cloud Platform region has arrived and is now available in the templ.io Panel. We always roll out new locations alongside Google Cloud Platform and we are really happy to say that the data center in Mumbai has now arrived.

According to Google, hosting a website in the new region can improve latency from 20-90% for end users in Chennai, Hyderabad, Bangalore, and of course Mumbai, compared to hosting them in the closest region, Singapore.

Except for Mumbai, India, we also have these locations to choose from right now:

  • Oregon, USA
  • South Carolina, USA
  • North Virginia, USA
  • Iowa, USA
  • London, UK
  • Frankfurt, Germany
  • St. Ghislain, Belgium
  • São Paulo, Brazil
  • Tokyo, Japan
  • Changhua County, Taiwan
  • Singapore
  • Sydney, Australia
  • Montréal, Canada
  • Eeemshaven, Netherlands

How to set up a WordPress site or WooCommerce store in Mumbai

Here are the simple steps to get started and set up a website in Mumbai:

  1. Sign up for a free 10-day templ.io trial account
  2. Activate your account with the verification link that was sent to your email inbox and log in to the templ.io Panel
  3. Click Create Website
  4. Name your website and select Mumbai in the location list

Click Continue and wait for the setup to finish. Once the process is done, you will be able to access your new WordPress site right away with an URL provided by us. You can also copy an existing WordPress site and migrate it to templ.io to compare the speed of your old host, to do that, please check our migration guide or contact us if you want us to do for you (for free).


Google Cloud Platform Expansion Plans

Above you can see the current regions available in Google Cloud Platform (purple pins) and future regions (blue pins).

Google Cloud Platform will expand with new data centers in Los Angeles, Montreal, Netherlands, Finland and Hong Kong. The expansion to Hong Kong has been confirmed by Google that it will happen in 2018.