WordPress security – 14 simple steps for improved security

When it comes to WordPress security, it’s not unusual for many to simply install a security plugin and call it a day, thinking that their site is now completely secure.

But, a plugin for improved security often makes your site very sluggish, is not a complete solution for security and might also give you a false sense of security.

Your site is only as security as its weakest link, that’s why it’s important that you consider the whole picture and that you try to improve as many security aspects as possible.

In this article we’ve collected a list of different measurements that are easy for anyone to implement and that can improve your site’s security a lot.

Is WordPress secure?

Yes! at the core, WordPress is very secure, but it is also very much your own responsibility for exactly how secure your website will be in the end.

WordPress has a very rigorous quality and security control and is often very quick to fix any vulnerability that are discovered. This means that if you are able to keep your WordPress installation up to date, there is very little risk that your website will ever be “hacked” because of WordPress itself.

The most common reason behind intrusion on one’s website is instead that the administrator has somehow neglected security, and has not followed all the advice that is available on how to keep his website safe.

A WordPress-hacker?

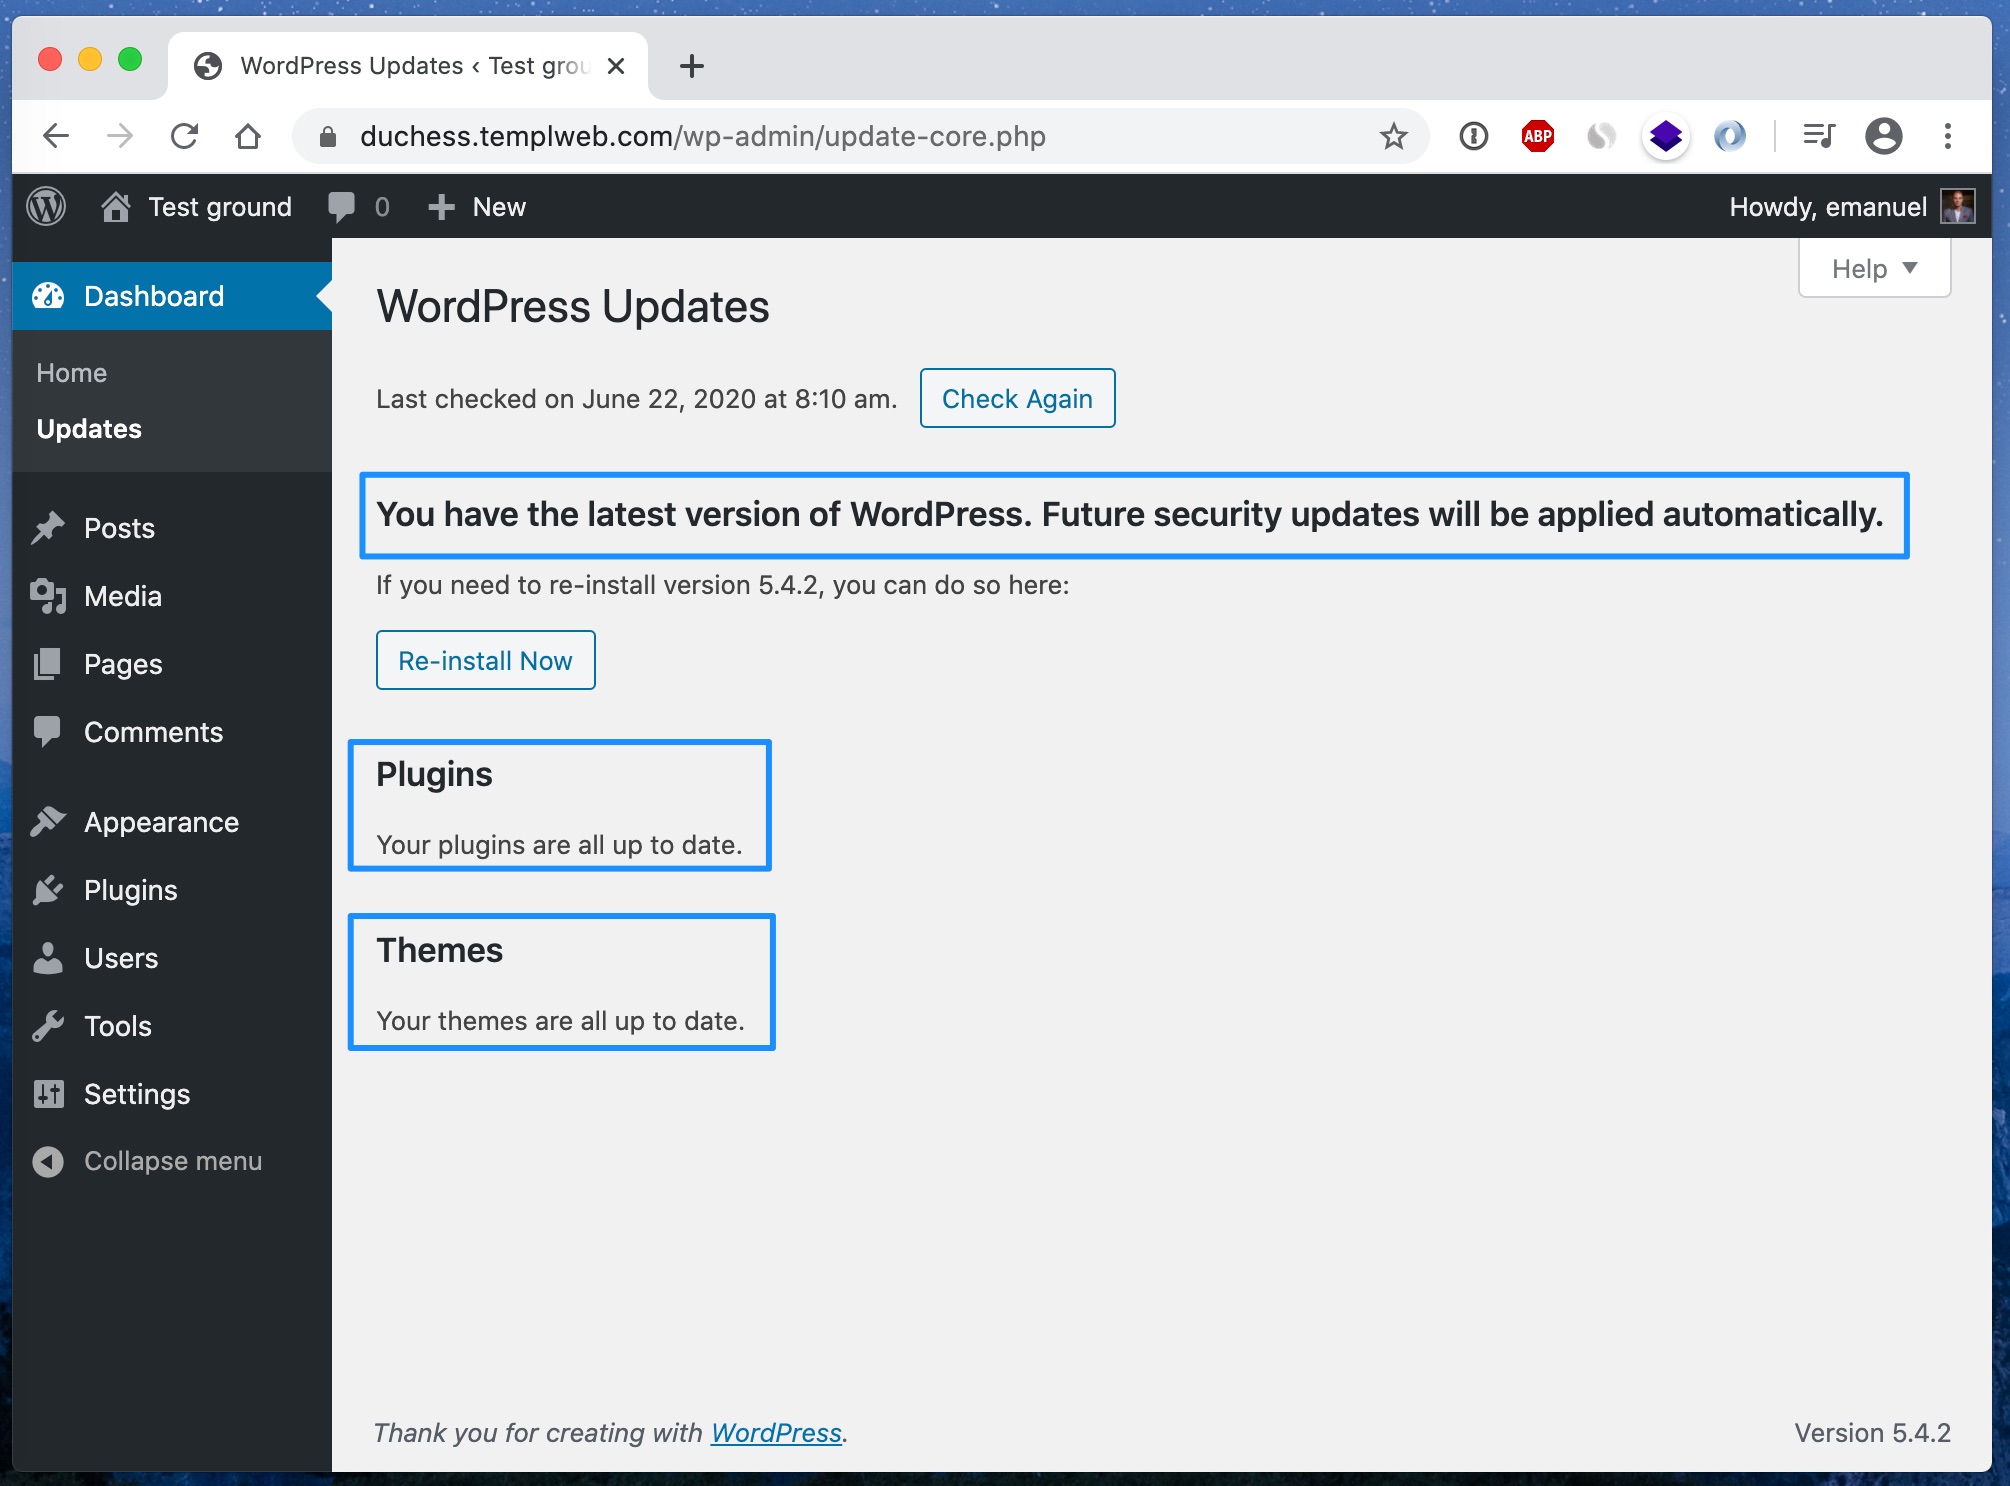
1 – Keep WordPress, plugins and themes up to date

Perhaps the most important security measure you can take is to keep your WordPress, plugins and themes up to date.

Since WordPress is an open source project, anyone can read all the underlying code and also help improve it, which of course has many benefits. But it also means that hackers and others with malicious intent can read the code and find vulnerabilities and use these to take control of other people’s websites.

Every time a security vulnerability is reported to the team behind WordPress, you can be sure that a security update will follow as soon as possible.

This means that if you do not use the latest version of WordPress, you are most likely to use a version that contains one or more known vulnerabilities. Hackers can in turn search for websites with old software and carry out targeted attacks against them.

Therefore, it is of the utmost importance to make sure you update WordPress, themes and plugins as often as you can.

Updating a website can sometimes be a little scary, especially if it is an e-commerce site, but it is often better that you yourself causes some downtime due to a bad update (provided you have backup) than someone unauthorized gaining access to it because of a known vulnerability.
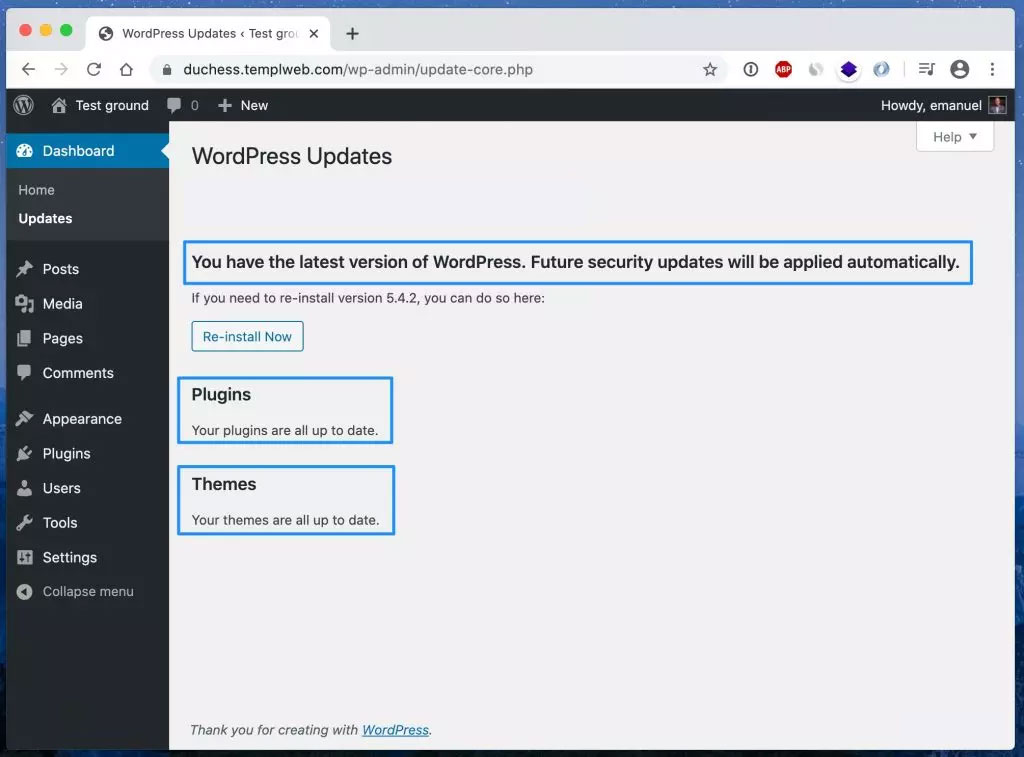
updates in wp admin

Automatic updates
In WordPress 3.7, automatic updates were introduced, which allows for minor updates and security patches of WordPress to be automatically installed on your website.

You can also activate automatic updates of themes and plugins by adding the following code to your theme’s functions.php file:

add_filter( 'auto_update_plugin', '__return_true' );
add_filter( 'auto_update_theme', '__return_true' );

Verify updates in a staging environment first
For some more system critical websites that absolutely need to be up all the time and that one does not want to risk being down due to an update that went wrong, it is a good idea to always update on a staging site first and verify that updates work correctly there before updating their live website.

That way you can make sure that no surprise problems arise when updating your live website.

2 – Uninstall inactive plugins and themes

A common misconception that people have is that inactive plugins can’t have any negative impact on one’s website, but the fact is that a hacker can exploit known vulnerabilities even in plugins and themes that are inactive.

Furthermore, if you have plugins installed on your site that you do not use, it is easy to forget to update them, which of course can mean additional security risk.

We therefore recommend that you always keep the number of plugins as low as possible and uninstall plugins that you do not use, to simply deactivate them is not enough.

3 – Use the right (restrictive) file permissions

File permissions determine who and what can read, write, and modify the files that make up WordPress as well as anything you have installed in WordPress. If your files do not have the strictest possible file permissions in place, hackers can more easily modify your files and do infringement of your site.

File permissions are usually specified in the form of 3 digits, e.g. 755, where each digit represents a user group and what that group has the permission to do.

The first group from the left is “user” (or “owner”) rights, the second is “group” rights and the third group is “others” rights.

Simply explained, one can say that the higher the number the more rights the user has. For the interested, here is an explanation of what the different numbers actually mean:

4 = read (r)
2 = write (w)
1 = execute (x)
0 = no permission (-)

Read + write + execute = 7
Read + write = 6
Read + execute = 5

All folders should have 755 or 750.

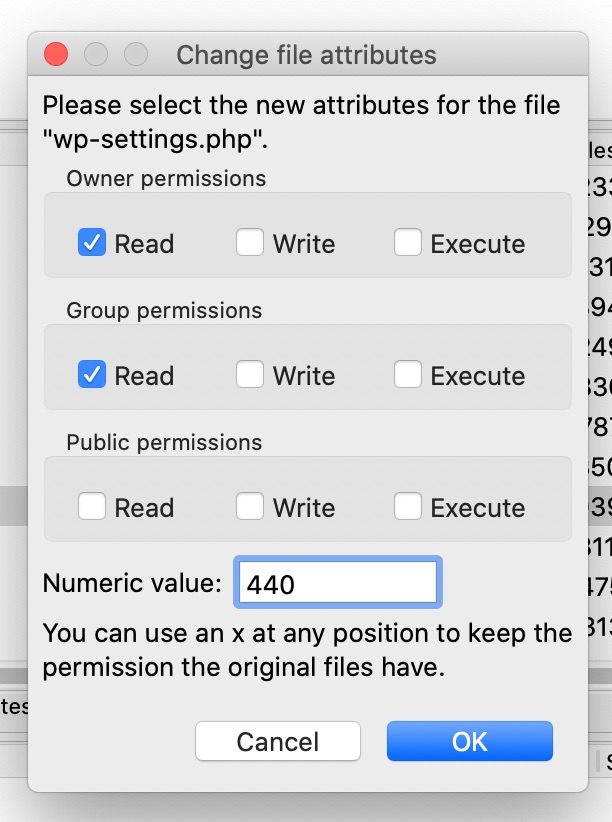
All files should have 644 or 640, except wp-config.php that should have either 440 or 400 to prevent anyone else from access it.

No folders should ever be set to 777, giving all users full rights. It should never be necessary as the PHP process is run by the file owner, and thus it can write in folders with 755.

Tight file permissions are extra important in a “shared hosting” environment, where you share server with strangers, to ensure that other users on the server cannot access your files.

How to change file permissions
Changing file permissions is easy and can be done using almost any FTP client such as the very popular and free FTP client FileZilla.

To change file permissions in FileZilla, just right-click on the file or folder you want to set the permissions for and press “File permissions …”

How to change file permissions in FileZilla

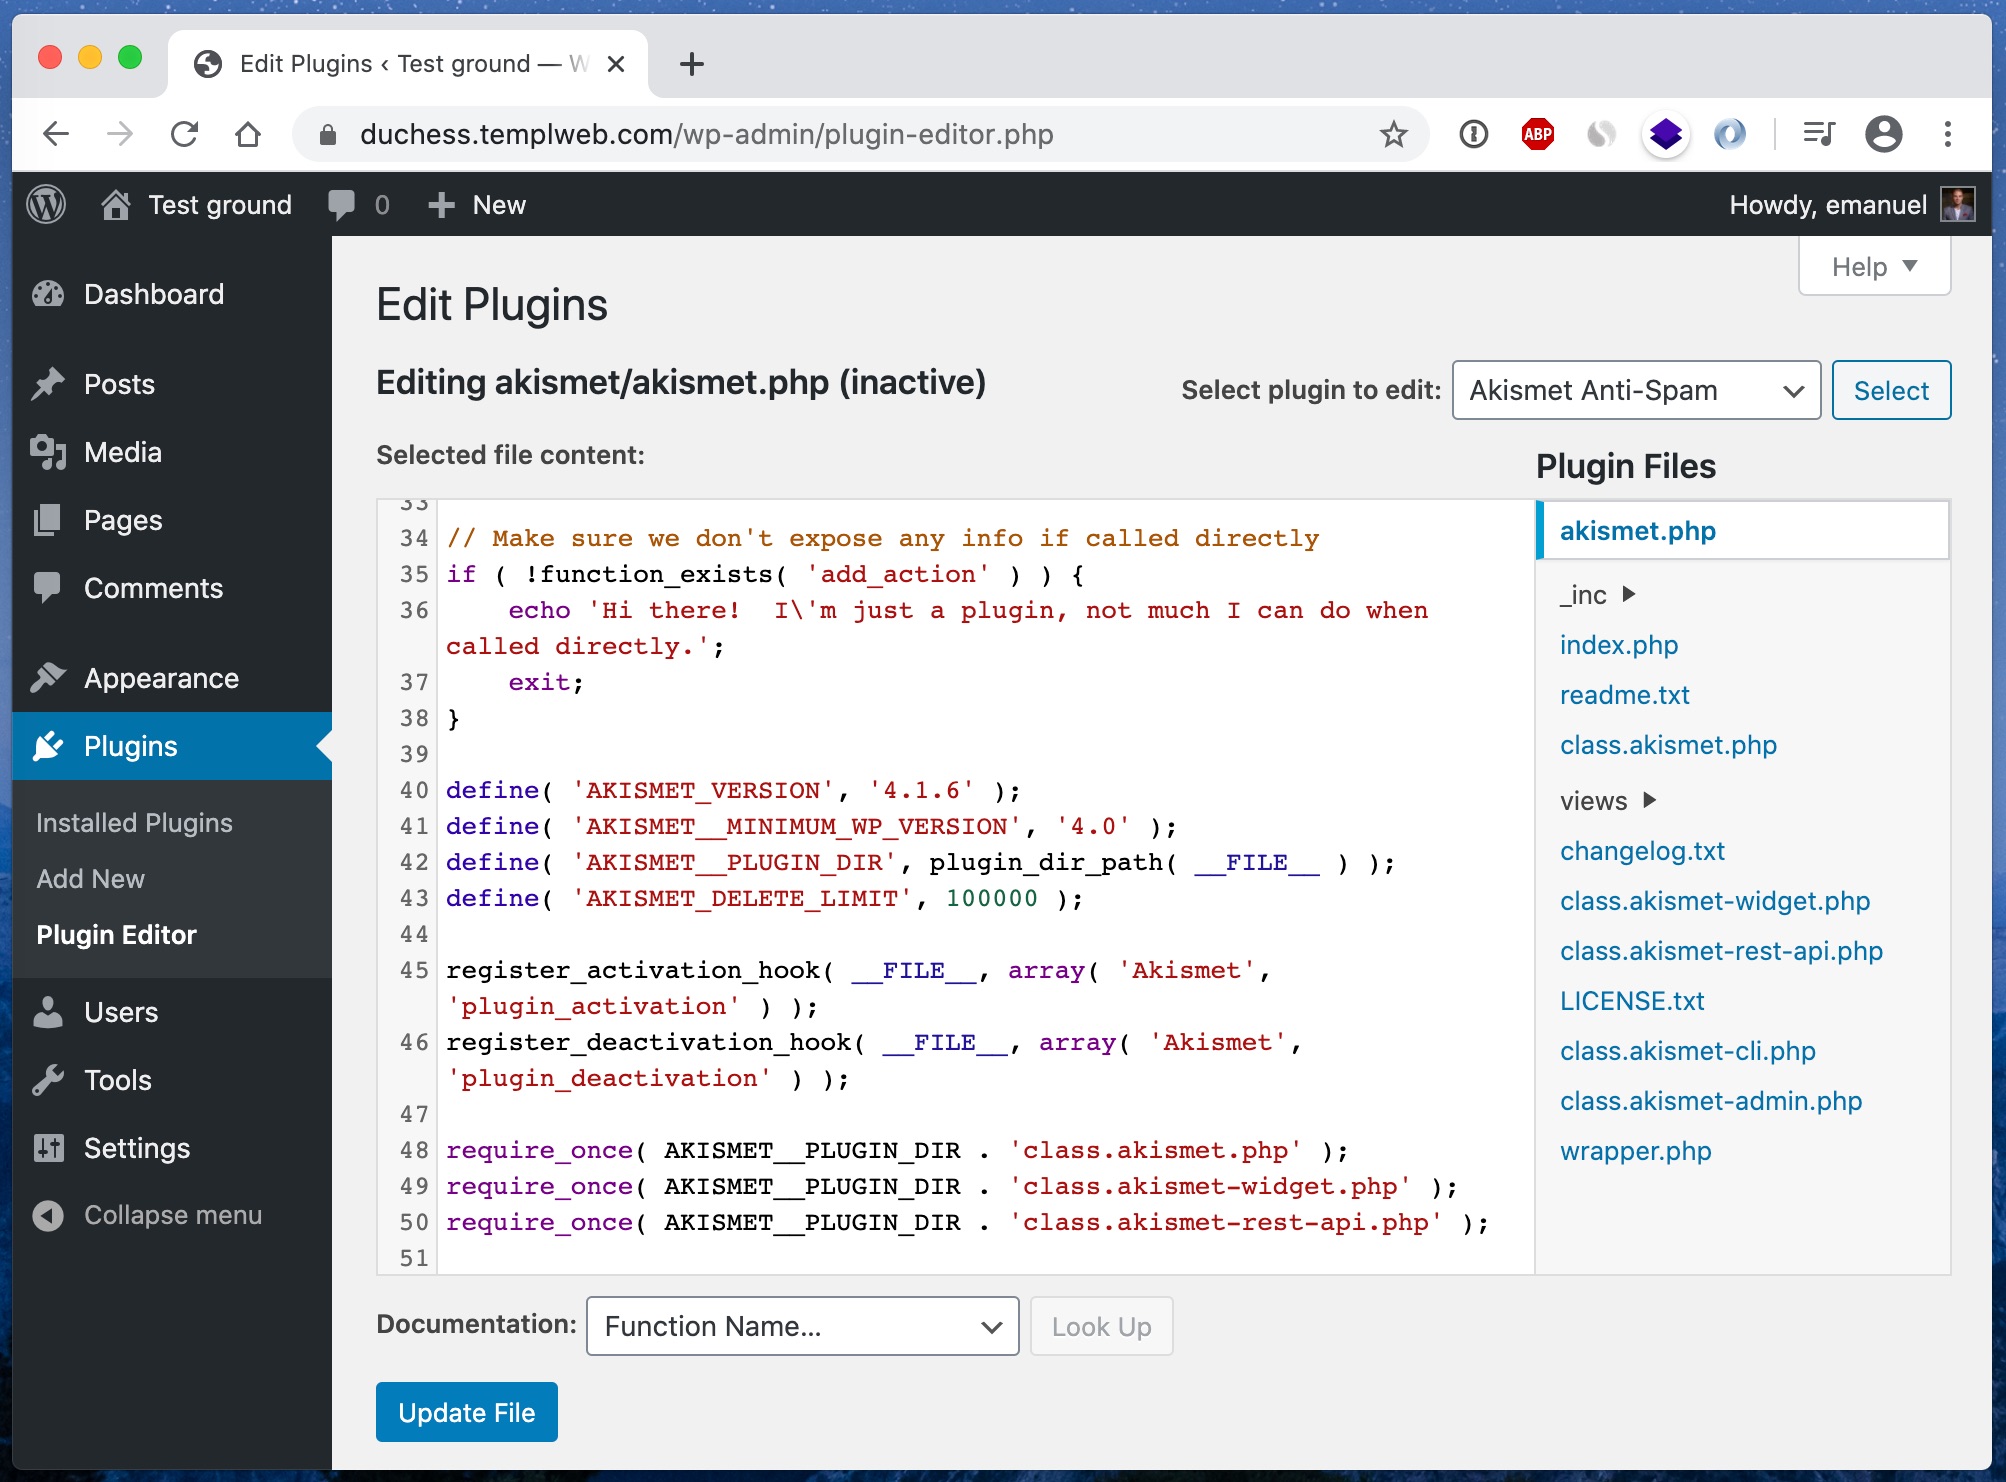
4 – Disable the built-in file editor

Did you know that WordPress comes with a built-in file editor for themes and plugins? It makes it easy to edit files on your website directly in WP Admin, which may be a convenience for some, but it can also pose some risks.

When the file editor is enabled, administrators can edit the code in the themes and plugins directly in the browser. It poses a potential security risk because you can easily make mistakes that cause the entire page to stop working when you make changes, and it also gives hackers quick access to all files that make up your website.

We recommend that you completely disable this built-in file editor and instead edit via files over SFTP.

The built-in file editor can be easily disabled in wp-config.php by adding the following code snippet:

define( 'DISALLOW_FILE_EDIT', true );
The built-in file editor in WordPress that we recommend to disable

5 – Set a custom database prefix

WordPress uses a prefix in front of all tables in the database, which by deafult is wp_.

Some attacks against the database assume this particular prefix, so if you instead use another prefix you can protect your site from some attacks.

The number of attacks that assume the default prefix is unlikely to be many, and changing the prefix on an existing WordPress installation is not entirely risk-free. Therefore, we recommend only choosing another prefix if you are going to set up a new installation of WordPress, and not to change the prefix on the existing page.

It can be wise to use a database prefix different than the default wp_

6 – Use strong usernames and passwords

One of the most common ways a hacker gets into a website is by “guessing” password.

If you use simple and commonly used passwords, it is possible for unauthorized persons to easily access your website through a so called brute-force attack where the attacker submits large number of different passwords until they get in. If you use a strong password, such an attack will in reality be impossible to succeed with.

Using strong passwords may seem obvious to some, but there are still many who use very bad passwords. Security companies like SplashData and NordPass compiles lists of the most common passwords every year. The 5 most common passwords in the latest list are:

  1. 123456
  2. 123456789
  3. 12345
  4. qwerty
  5. password

Make sure to use a long and complex password that is randomly generated and that’s preferably exclusive to your website as well.

It is also quite common for people to use the username “admin” for their administrator account. Instead, for extra security, it is recommended to use a different username, making it even more difficult for a hacker to guess the correct username and password.

Passwords should be long and preferably unique

7 – Implement 2FA (Two-Factor Authentication)

2FA, or two-factor authentication, is a security process that combines two different verification methods at login: usually something you know (your password) with something you have (a unique code sent to your mobile via SMS or generated by an authentication app). This gives your website an extra layer of security that significantly reduces the risk of unauthorized access. If your password is compromised, the account remains protected thanks to the second step of authentication.

Here’s how you implement two-factor authentication on your WordPress site:

Choose a 2FA plugin: An example of a popular 2FA plugin is Wordfence Security. The 2FA plugin provides the functionality to add two-factor authentication to your WordPress site. Once installed, it can be configured for various authentication methods, including code generation from authentication apps.

Choose an authentication app: Two popular authentication apps are Google Authenticator and Microsoft Authenticator. These apps serve as the second factor in the 2FA process. When configuring your WordPress plugin for 2FA, you can choose to use these apps as your method of authentication. Typically, you scan a QR code from the WordPress plugin with the selected authentication app to link the account. The app then generates a unique code that is used for each future login.

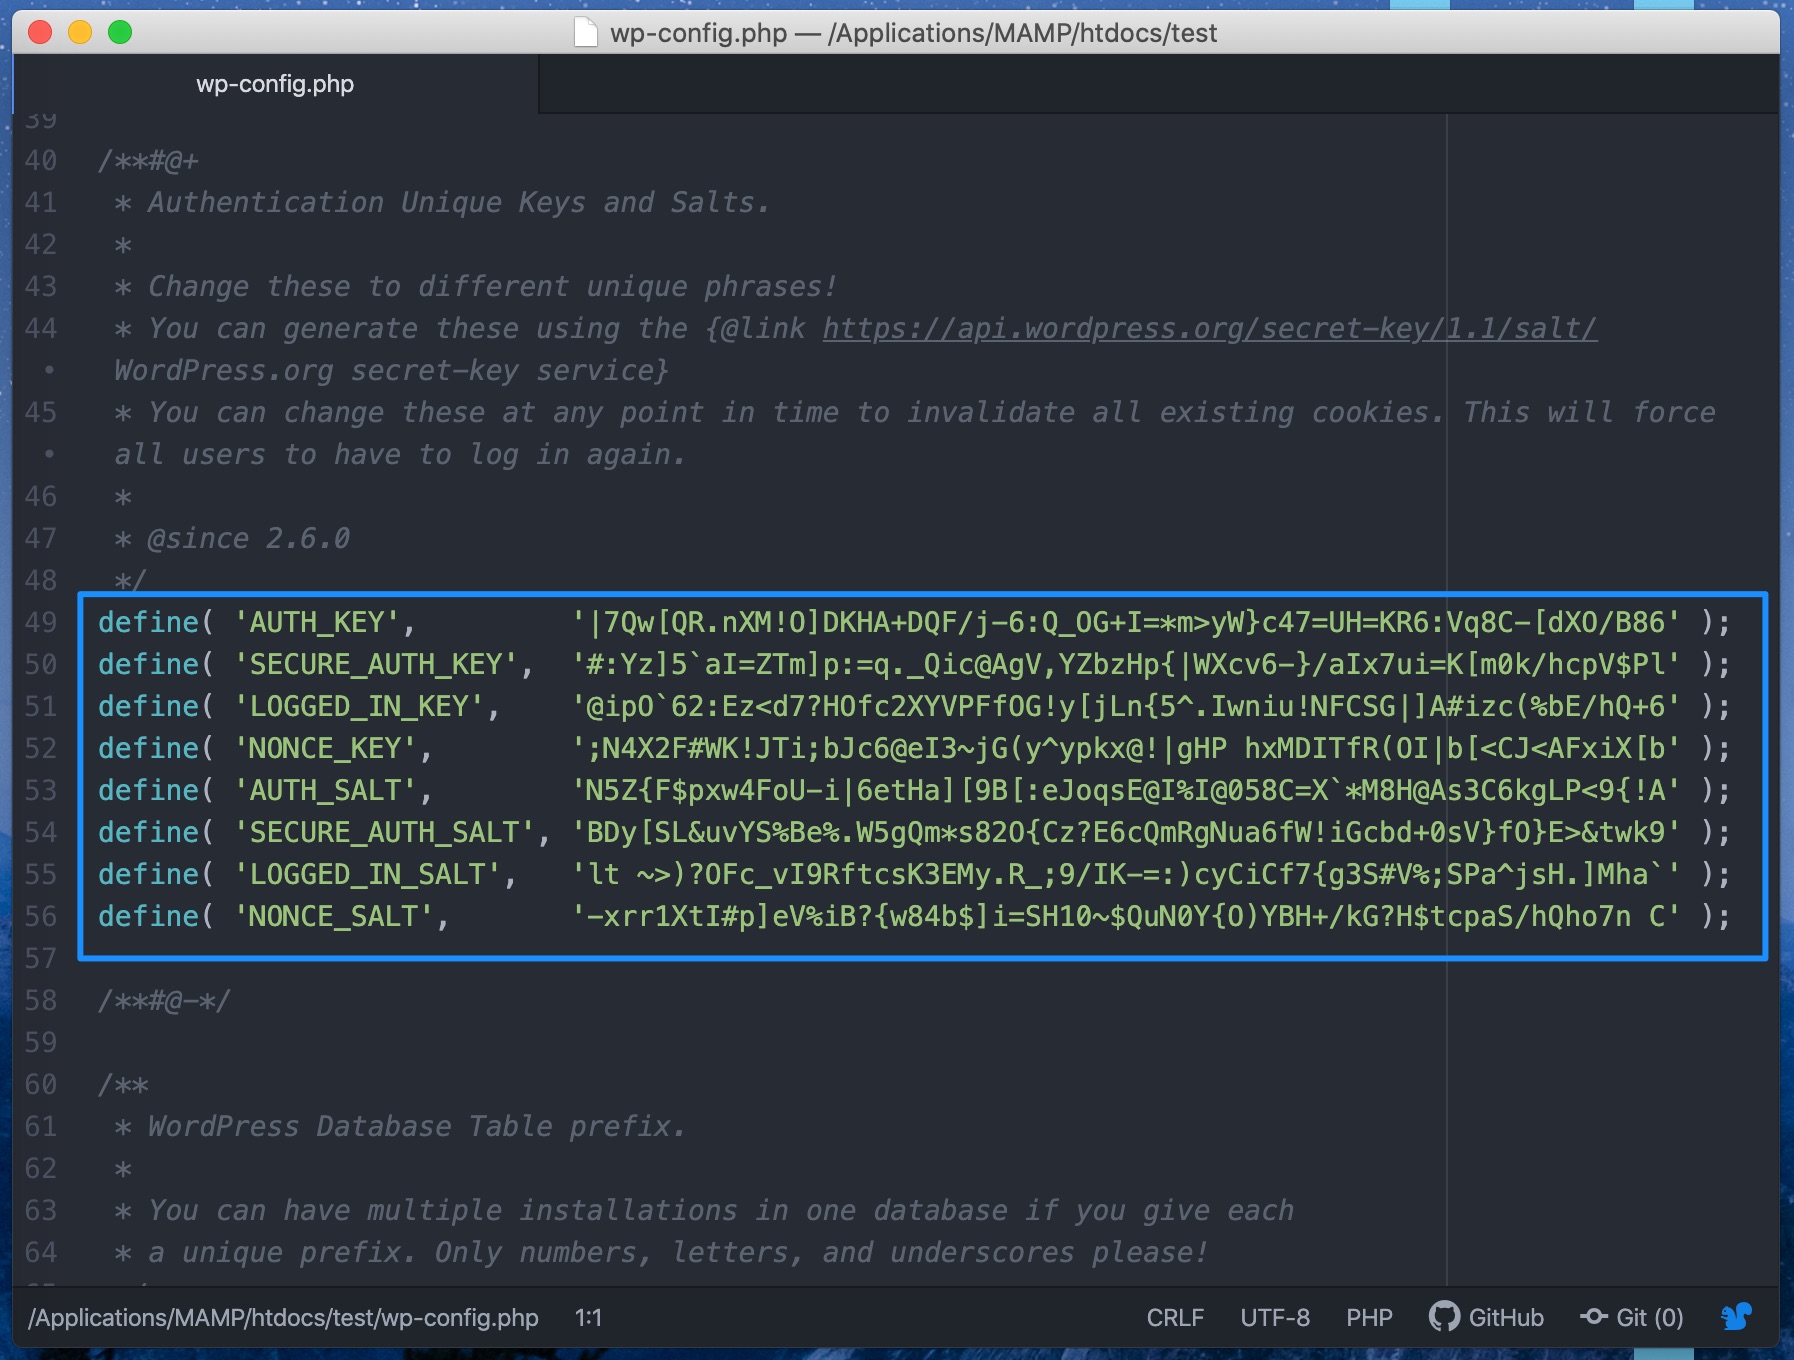
8 – Change security keys in wp-config.php

WordPress security keys are a collection of randomly generated variables that help improve the encryption of data stored in visitors and administrators cookies.

There are four different security keys: AUTH_KEY, SECURE_AUTH_KEY, LOGGED_IN_KEY, and NONCE_KEY.

When you install WordPress, these are generated in a random way and are unique to your site. However, if you have ever moved from one web host to another, or if you have taken over your website after another owner, then it may be a good idea to generate new security keys.

These can easily be replaced at any time, but it means that everyone who is logged in to your site will be logged out.

You can easily get a collection of newly generated security keys through a smart tool on WordPress.org and then paste them into wp-config.php.

It’s best to replace the security keys in wp-config.php after moving from one host to another

9 – Disable XML-RPC

XML-RPC is a feature in WordPress that was previously used for communication between WordPress and some other systems, such as other blog networks. In recent years, however, this feature has been slimmed down as its use has been steadily declining, and the feature is planned to be completely removed in the future and replaced with WordPress’s own API instead.

Today, the actual use cases of XML-RPC are quite few. Instead, it has become a popular “tool” for hackers, as it allows testing hundreds of password combinations with a single command.

If you use Templ as a web host then XML-RPC is already disabled from the start, and if you use any other web host then it is relatively easy to disable that function in other ways.

You can either disable XML-RPC using a plugin, or by pasting some code into one’s theme’s functions.php file:

add_filter( 'xmlrpc_enabled', '__return_false' );

.. or even better is to disable it using .htaccess:

<Files xmlrpc.php>
order deny,allow
deny from all
</Files>

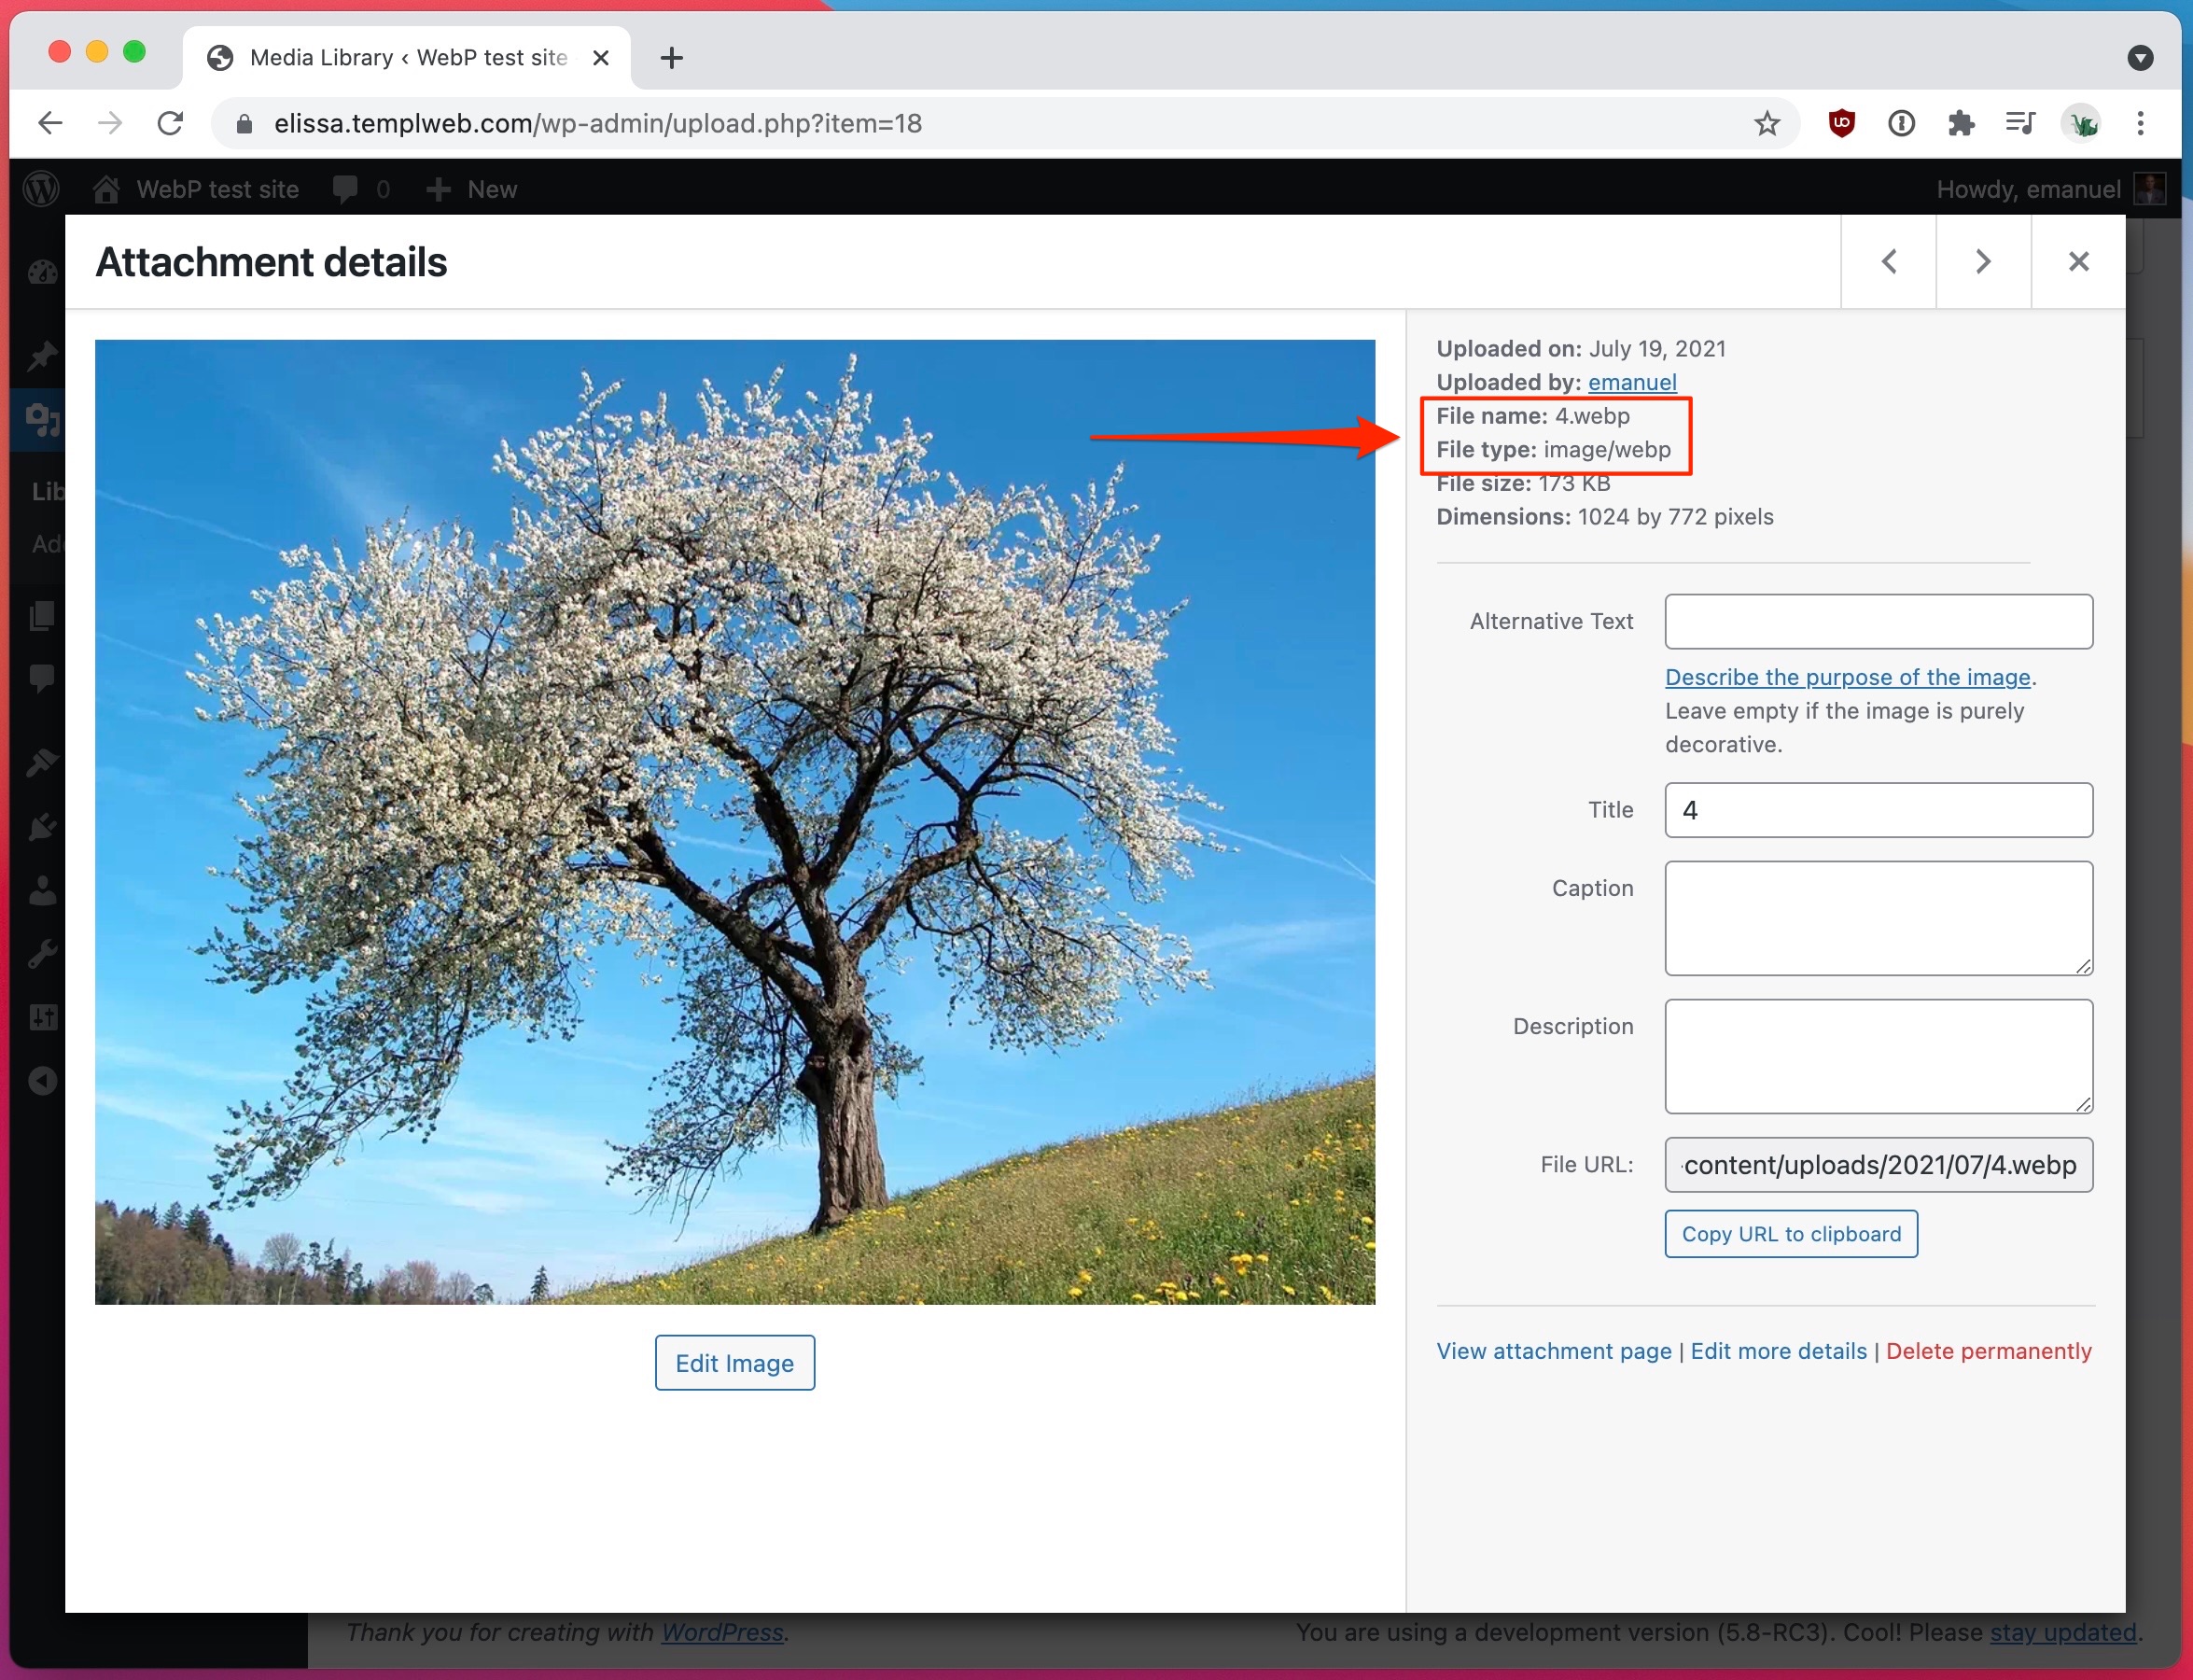
10 – Hide what WordPress version you are using

Which version of WordPress that are used on your site is usually visible in your site’s HTML code, so if you have an old version of WordPress with known vulnerabilities then it is very easy for a hacker to access that information.

Although we of course recommend that you always run the latest version of WordPress, it can still be a good idea to hide the version number for your visitors. The less outsiders know about your WordPress installation, the harder it is to make targeted attacks against it.

It’s easy to hide WordPress version with a little code in functions.php:

function wp_version_remove_version() {
return '';
}
add_filter('the_generator', 'wp_version_remove_version');
What version of WordPress you are using is visible in the HTML code, if you don’t hide it

11 – Use SSL and HTTPS

Although SSL has become something of a given thing today, it does not hurt to once again emphasize the importance of SSL if you want a secure website.

With an SSL certificate you can use the encrypted protocol HTTPS instead of old and unencrypted HTTP. This means that when you fill in, for example, a login form on a page with HTTPS, the information is encrypted, including passwords and other sensitive information, making it impossible for anyone else to eavesdrop.

Although the biggest advantage of SSL is security, it is also today strongly associated with SEO benefits (because Google and others prefer HTTPS over HTTP), increased visitor trust.

Having an SSL certificate and running your site over HTTPS is definitely a must.

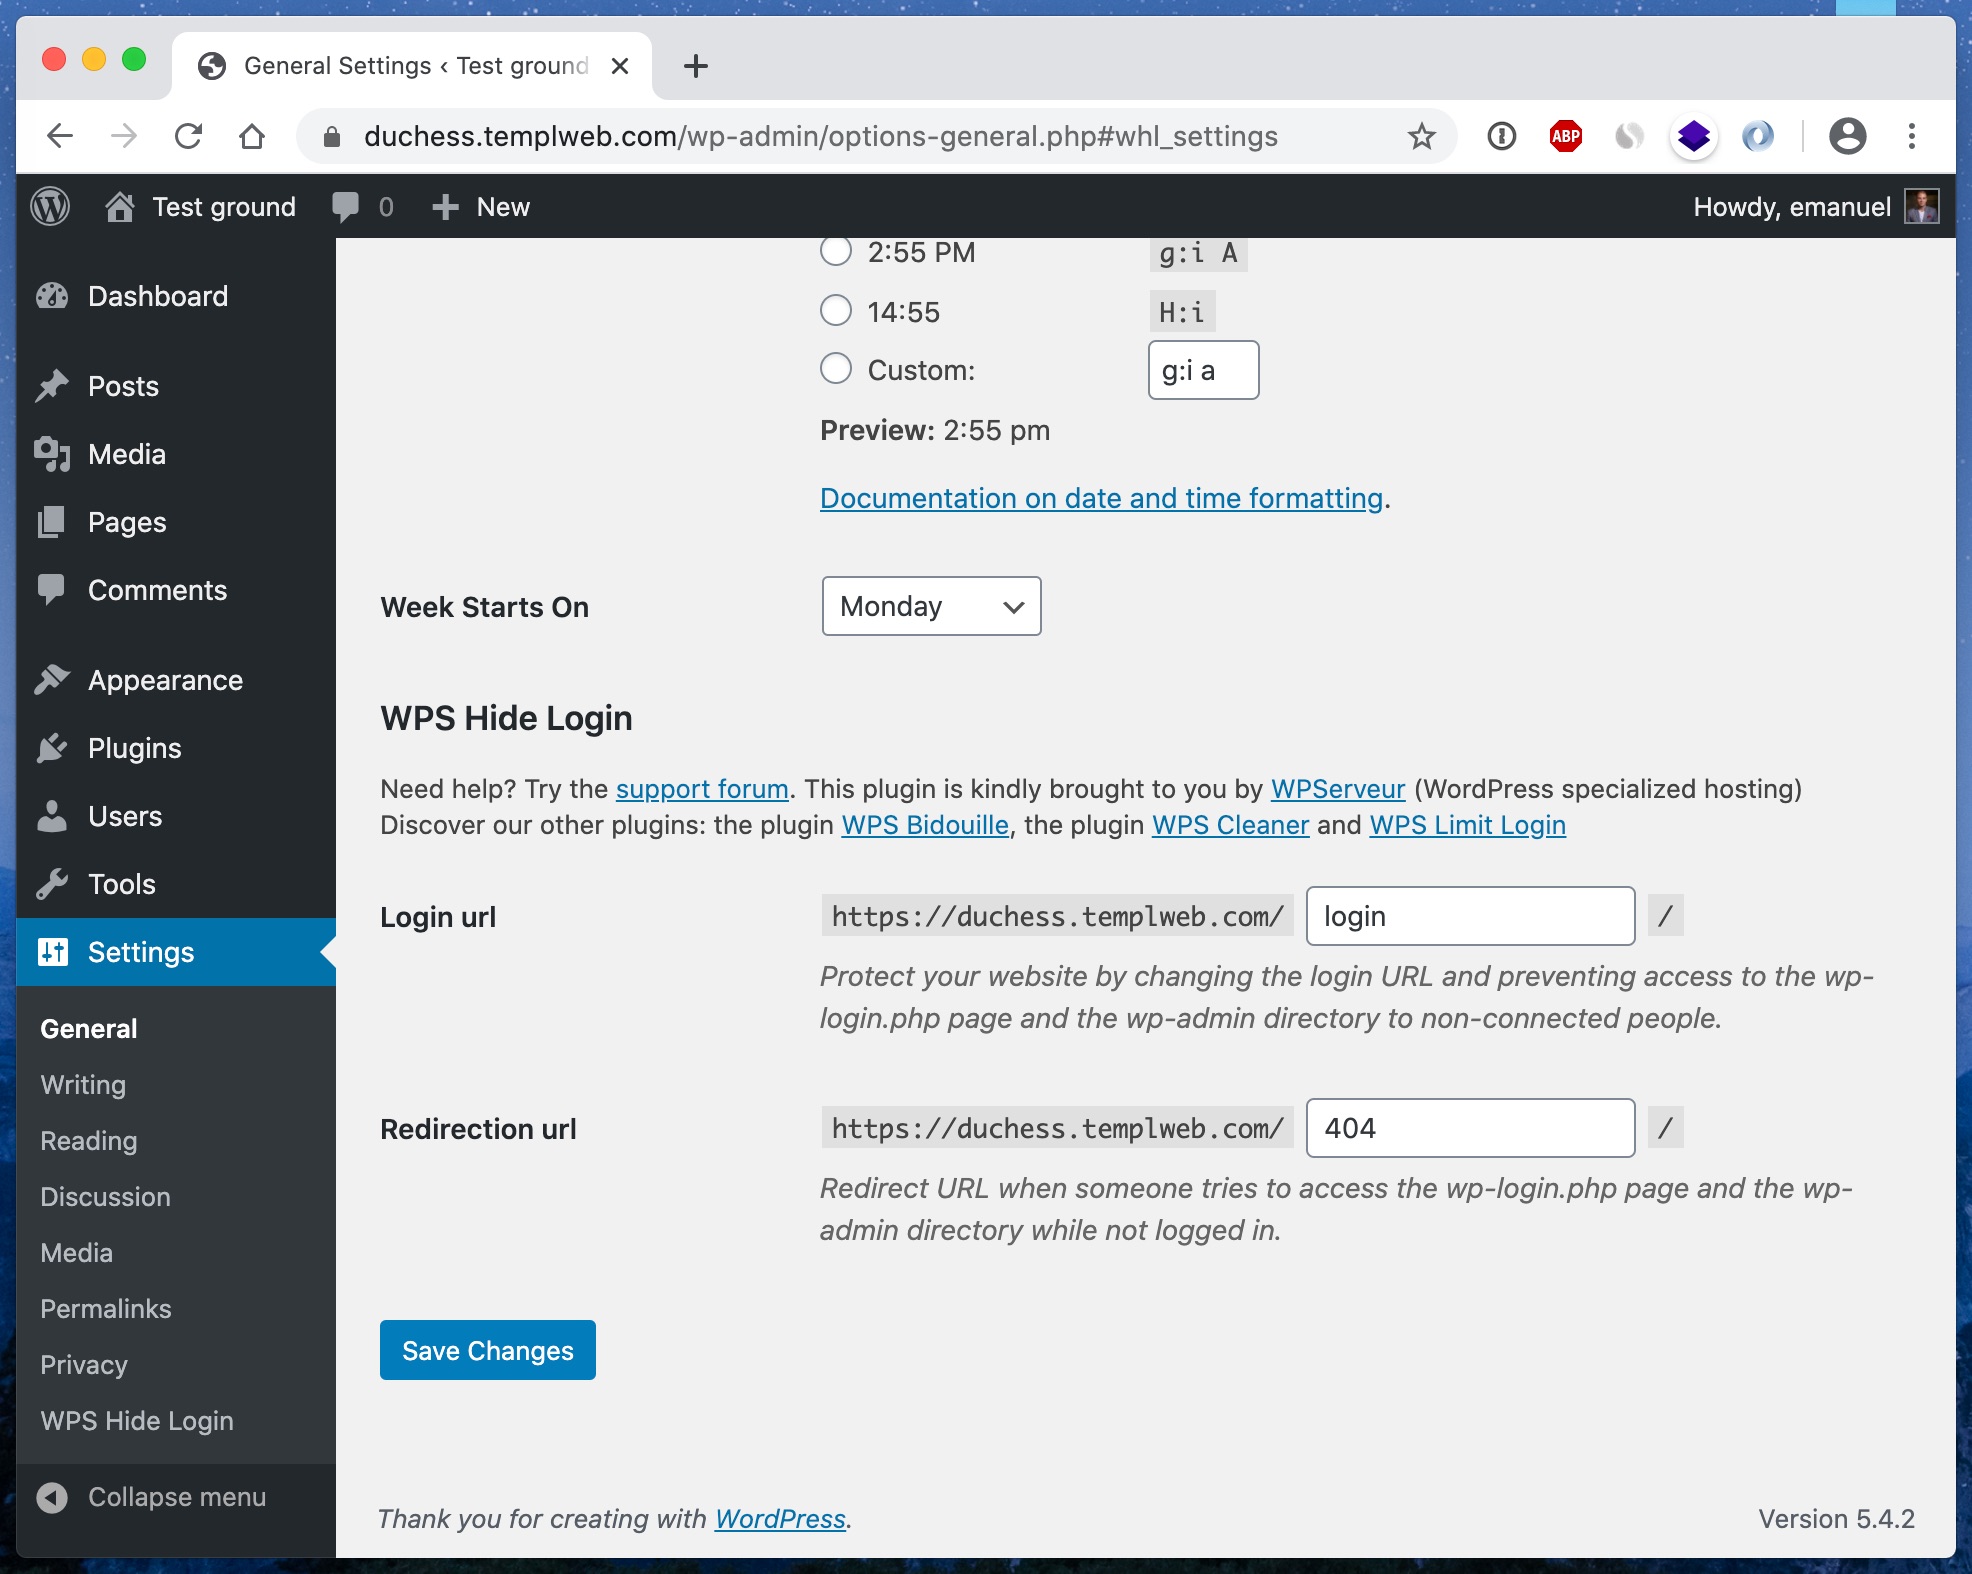
12 – Change WP Admin URL

All WordPress sites initially uses one and the same URL for WP Admin, namely example.com/wp-admin. One potential problem with this is that everyone knows of this address, including bots and hackers.

By changing the URL to WP Admin you can make a site less vulnerable to attacks.

You can easily change the address of WP Admin by using the WPS Hide Login plugin. Which we also describe in detail how to set up in another blog post.

It’s important to keep in mind that this is not a solution to all problems, but it can clearly be one way to make it more difficult for hackers to access your site.

The URL of WP Admin can easily be changed using the plugin WPS Hide Login

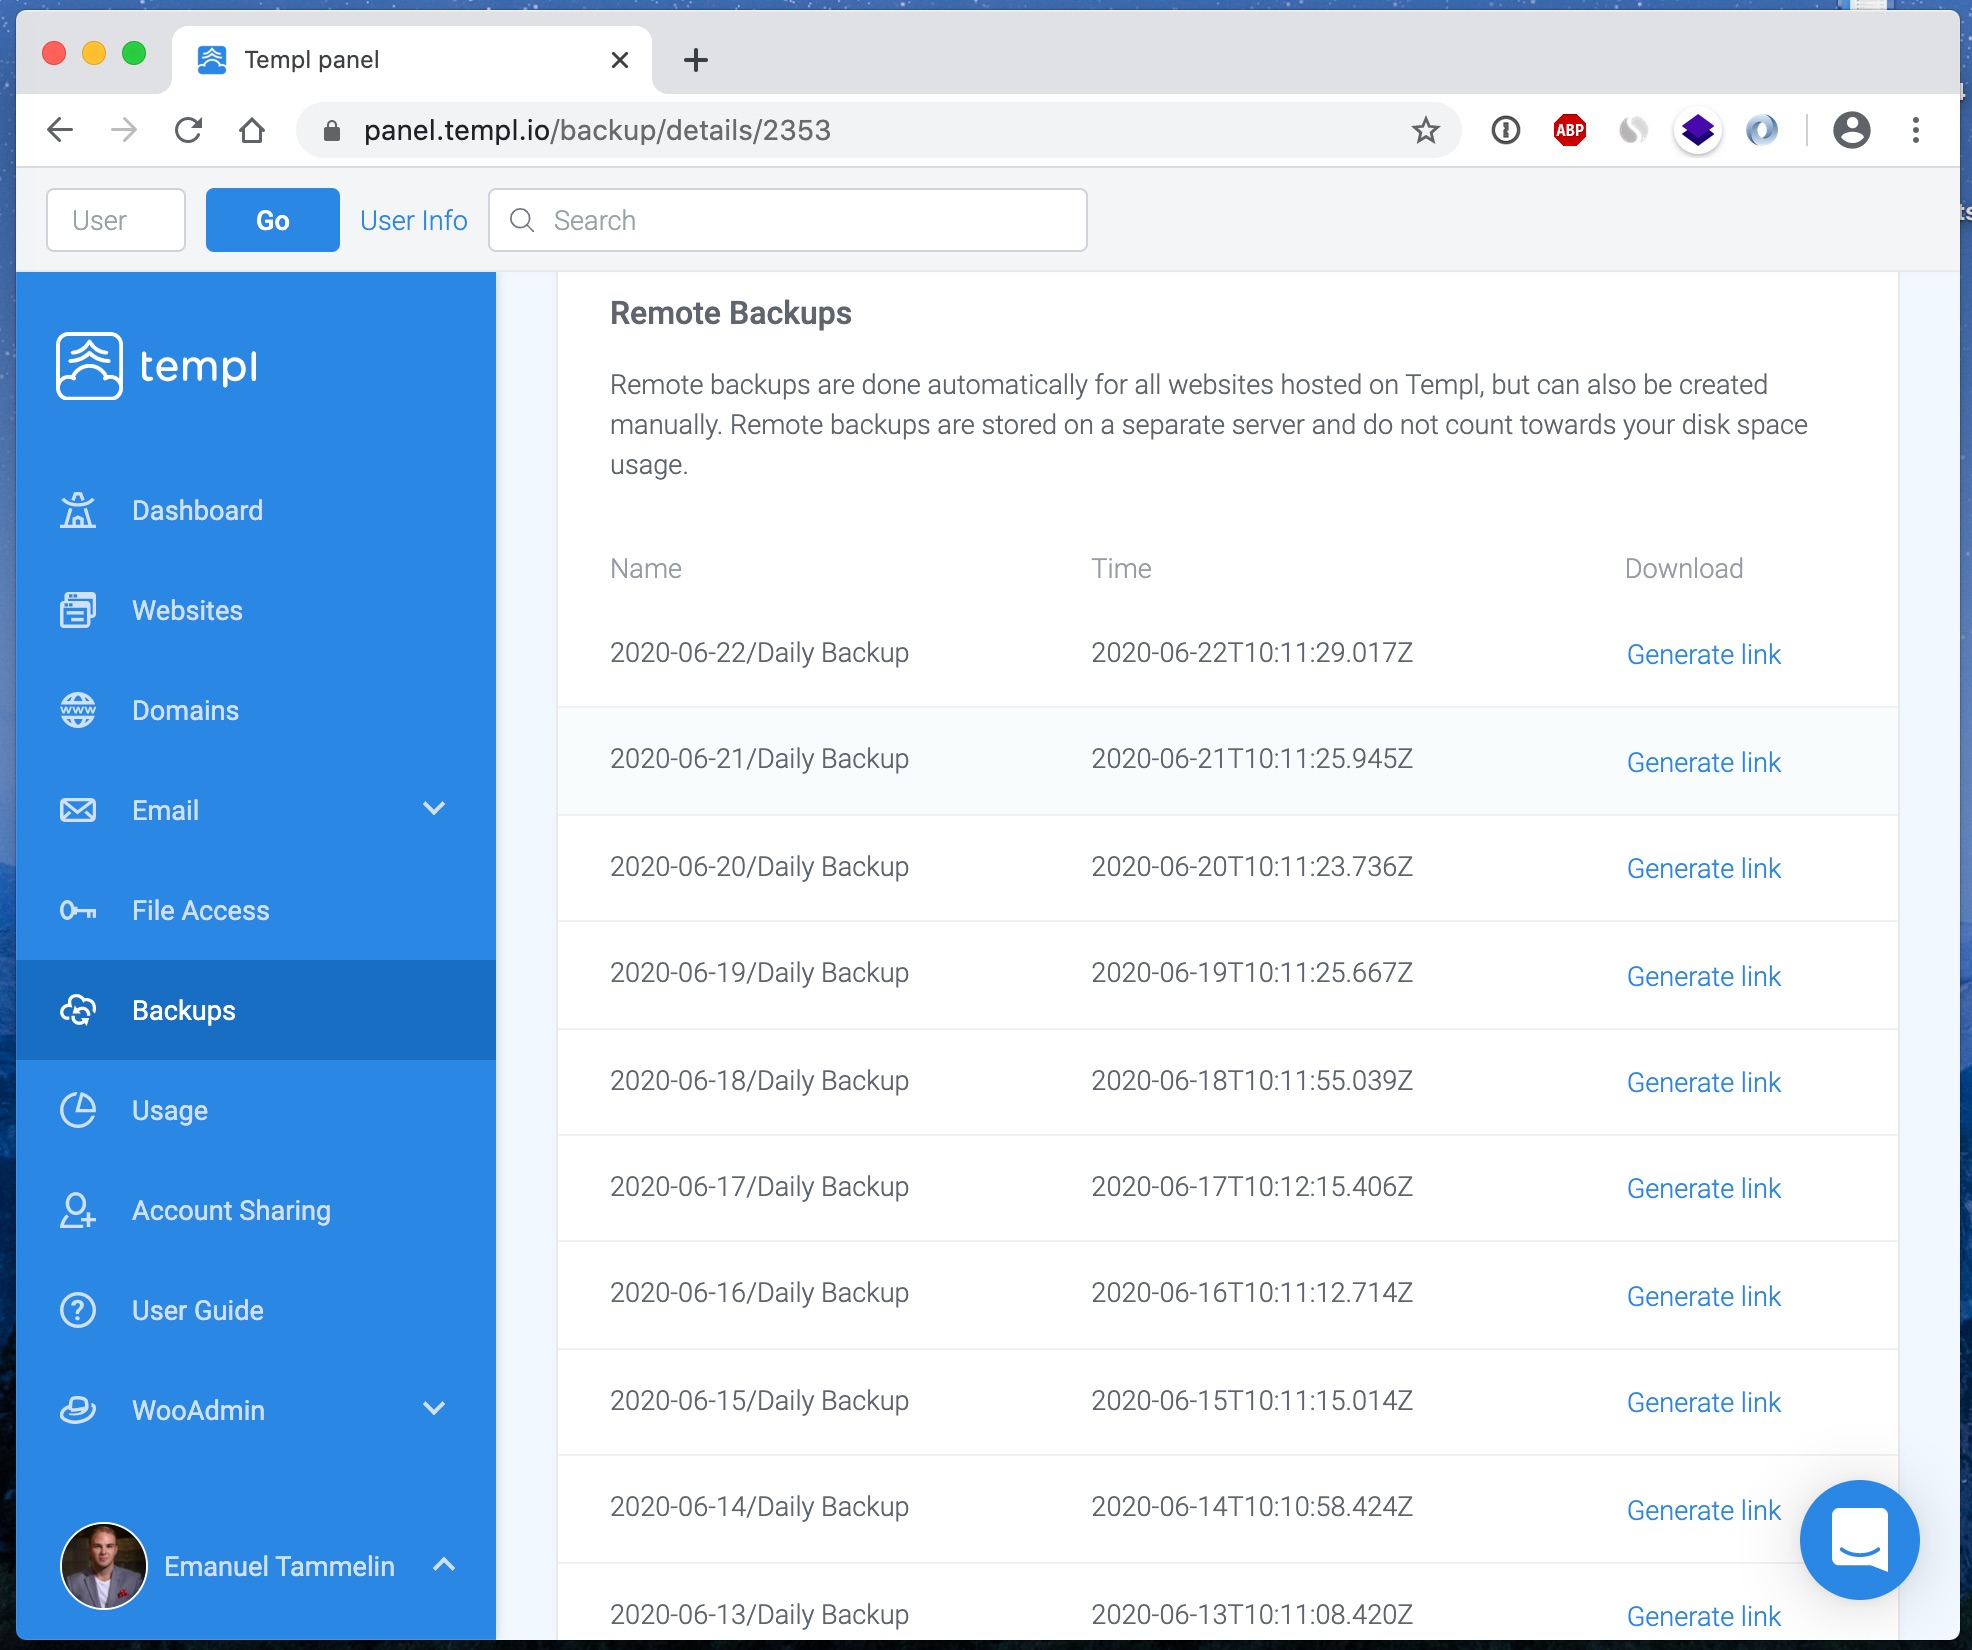
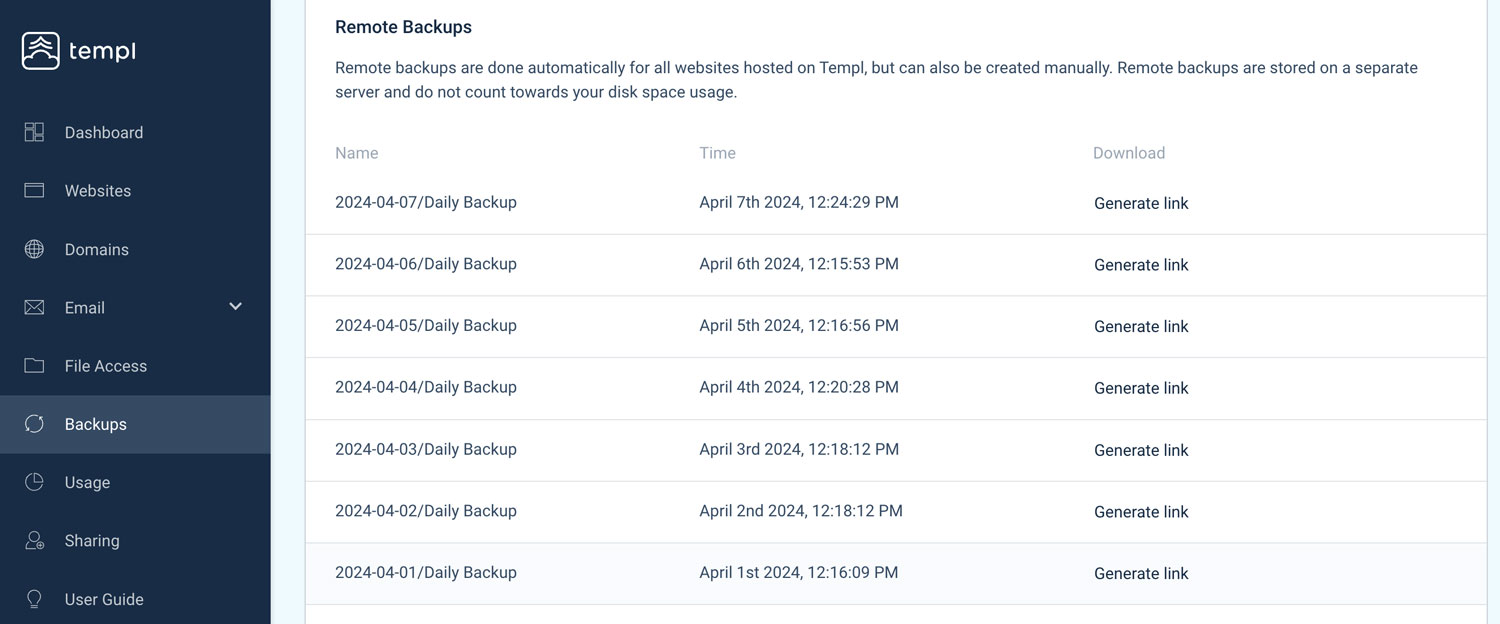
13 – Make sure to take daily backups

Backing up your website is of course not an action that prevents it from suffering any kind of attack, but on the other hand it is absolutely invaluable to have in case disaster strikes and you need to be able to “rewind the tape” to save your website.

No matter what preventative measures you take, your website will never be 100% secure. Therefore, one should always make sure that backups of one’s website are taken on a regular basis.

Most web hosting companies in the premium segment take daily backup of all websites, as do we at Templ. In case your web host does not offer automatic backups, then it is quite easy to solve on your own by using for example the plugin UpDraft, but you should then keep in mind that a backup plugin will affect your website’s performance and use much of the storage space you pay for in your web hosting plan.

Templ panel backups

14 – Choose a secure hosting solution

When it comes to security and WordPress, there are many factors at play that sit deeper than the website itself. There are also a lot of security measures that need to be taken at the server level, of which your web host is responsible. At Templ, we take security very seriously and always have a safety mind in everything we do.

It is very important to choose a web host that you can really trust, or that you yourself have extremely good knowledge of security if you choose to place your website on a VPS and thus bear the entire responsibility for security yourself.

It is also important to know that different web hosting companies have vastly different policies for what they do when a website is hacked. Some web hosts simply shuts down websites that have been hacked and don’t want to know of them, while we at Templ offer free help to rescue hacked website.

A web host that takes security seriously often has:

  • A firewall that protects against various attacks
  • Latest version of PHP, MySQL and other software
  • Daily backups
  • Support available around the clock
  • 24/7 monitoring of all websites
  • And a number of other advanced features for better security

Final words

In conclusion, it is worth repeating that WordPress itself is very secure, but that it is important to keep everything updated and that you use common sense.

It is also important to remember that there are many factors that affect the security of one’s website that is “deeper” than WordPress itself. Therefore, it is important that you either have a very good understanding of IT security yourself or that you choose web hosting that takes security seriously.

Daily backups of one’s website are also an absolute must so that you have something to fall back on, should a serious accident occur.

If you have any questions about WordPress security then you are welcome to ask us in the chat here on this page or to post in the comment box below.

Good luck! 🙂

How to Speed Up Your WPML Website 2022

WPML currently has over one million active users, including us at Templ. According to WPML themselves, the key to their success has been offering a user-friendly tool, which does not require any coding skills. Other popular features of WPML are as follows:

  • The possibility to translate every part of your website
  • Compatibility with popular themes, plugins, and page builders
  • Rigorous security and release of new updates of its plugin in a continuous manner
  • Beneficial your multilingual SEO
  • Fully integrated with WooCommerce and popular WooCommerce plugins
  • Possibility to choose if you want to translate the website on your own, automatically (and review before publication), or send the content to a translator
  • Global support six days a week

How to optimize your WPML page

WPML has four general tips on how to speed up your website with their plugin installed:

  1. Keep WordPress and your plugins up to date – Using old versions of plugins usually cause problems, and WPML is no exception. WPML’s plugin has become significantly faster since version 4.2.8, and you can see up to 60% shorter loading time when updating to a new version.
  2. Use a fast host – Using a web host that focuses on page speed is an effective way to increase the speed of your website. Ask your new host for a free test to ensure that the website is faster before moving away from your current provider permanently.
  3. Use cache – By caching your website, the server avoids generating the same content over and over again. There are several popular cache plugins such as WP Rocket and WP Fastest Cache. At Templ, we offer the possibility of activating cache at server level, which is faster and uses fewer resources than a plugin.
  4. Use PHP 7.0 or above – PHP 7 is more than twice as fast as PHP 5. At Templ we always offer the latest version of PHP. If you want to upgrade, please contact us.

WPML offers a 12-months performance guarantee

wpml-performance-guarantee

These four tips and the guarantee will go a long way, but I recommend you follow these extra recommendations to make your website as fast as possible:

Choose a light theme

A light theme means that it has well-written code without mambo jumbo, which the server can quickly process and is fast for visitors’ browsers to load. Changing the theme can be time-consuming, but I recommend you consider it if you suspect that your theme is making your website slow.

Some themes load slower than others because of a lot of unnecessary functionality, which you do not use. If you want to evaluate how your theme is performing, we recommend you measure the number of requests your website’s pages have, and how big they are, and compare these on a copy of your website, where another theme is installed.

Three light and popular themes are Storefront, Astra, and GeneratePress.

Minify and combine CSS and Javascript files

Minifying code, combining files, and changing the order in which files are loaded, are all effective ways to optimize your website. If you have a cache plugin, such as WP Rocket, you can let it do this optimization for you. The Autoptimize plugin is another popular option with more than 3 million active installations.

At Templ, we offer the option to use Google’s PageSpeed Module, which optimizes your website at server level.

smaller

Avoid external resources as much as possible

Your website’s resources are mostly retrieved from the server where the website is hosted – these are called internal resources. It can also retrieve resources elsewhere and is then called external resources.

  • Social Media like Facebook and Instagram
  • Google Fonts
  • Tracking via Google Analytics and other marketing tools

Why do external resources slow down your website?

  • With a so-called DNS lookup, your website needs to check every domain it gets resources from. The more domains your website needs to retrieve resources from, the more time-consuming it will be.
  • External resources can sometimes be render-blocking, which means they prevent the remaining content on the page from being rendered until the external resource has been downloaded in its entirety. If the external resource is early in the order, it can mean that it takes an annoyingly long time before the visitor sees any content.
  • If you want to see what external resources your website loads, you can find them here:
  1. Go to your website
  2. Open the dev tools in your browser
  3. Go to Network -> JS, and you will find your external resources under “Name” or “Domain” depending on which browser you are using.

Preload cache

WPML recommends using cache, and it is a must if you want to make your website fast. If you are serious about your website, you should optimize the website’s cache so that as many visitors as possible will have your pages served from cache.

Preloading cache on pages you expect visitors to improve the loading time where it is most needed in a smooth and time-efficient way.

Cache can be preloaded with the WP Rocket plugin, which offers the best flexibility and superior user-friendliness.

wp-rocket-logo

Clean your database

Your website’s database may, in time, become full of unnecessary data. By cleaning it, you make your website lighter and faster. To clean your database, you can use our free plugin Templ Optimizer.

Templ and WMPL

Templ is fully compatible with WPML, and you are more than welcome to contact us with questions about the plugin or if you want our help in speeding up your website. Good luck! 🚀

WordPress 5.8 is here – WebP images now supported natively

Today it was time for yet another major release of WordPress, namely WordPress 5.8.

But what exactly is new in this latest release? We’ll take a closer look to find out!

What’s new in WordPress 5.8?

The focus for this update has been to continue moving towards “full site editing” using WP’s block editor, and new for WP 5.8 (among other things) is the block-based widget editor.

When navigating to Appearance -> Widgets, one is now introduced to the familiar block editor interface that lets one add, remove and edit current widgets.

This is certainly one step to make the user experience across WP Admin more consistent and familiar.

Block-style widget editor in WordPress 5.8
WordPress 5.8 now has a block-style editor for widget areas.

The full list of updates and new features in WordPress 5.8 looks like this:

  • Manage Widgets with Blocks
  • Display Posts with New Blocks and Patterns
  • Edit Post Templates
  • Overview of the Page Structure
  • Suggested Patterns for Blocks
  • Style and Colorize Images
  • theme.json
  • Dropping support for IE11
  • Adding support for WebP
  • Adding Additional Block Supports
  • Version 10.7 of the Gutenberg plugin

Native support for WebP images

One of the biggest and most notable features in WordPress 5.8 is the added support for WebP images.

The native support for WebP images that’s introduced allows for uploading of .webp files directly in WP Admin, exactly like one would upload more traditional image files such as JPG, PNG and GIF.

WebP image in WordPress 5.8
WordPress 5.8 adds support for WebP images.

WebP offers much more efficient compression compared to JPG and PNG and can help to reduce the footprint of your website and speed up load times.

Please note however that WebP is not supported in older browser so all your visitors might not be able to see WebP images that you publish.

For a more detailed look at WebP support in WordPress, check out our ultimate guide to WebP images in WordPress.

New features for developers

For developers in general, and theme developers in particular, it’s good to know of the new support for a theme.json file, which allows for easier theming of the block editor.

An example of how to add palette colors using theme.json looks like this:

{
    "version": 1,
    "settings": {
        "color": {
            "palette": [
                {
                    "name": "Black",
                    "slug": "black",
                    "color": "#000000"
                },
                {
                    "name": "White",
                    "slug": "white",
                    "color": "#ffffff"
                }
            ]
        }
    }
}

It sure seems like this will make fully implementing the block editor in one’s theme easier than before. A much welcome addition to WordPress core.

Summary

All in all, this is a solid WordPress update that brings many improvements across the board.

At Templ we are mostly excited about the addition of WebP support however. 🙂

How do you like this new update of WordPress core? What’s your favorite feature? Let us know in the comment section below!

The ultimate guide to WebP images in WordPress

These days, when load times and web core vitals are more important than ever, serving images in WebP format seems like a no-brainer.

Making images smaller in size, speeds up your website and saves on bandwidth.

WebP files are typically up to 25-35% smaller than JPG and PNG, without losing in image quality.

But how does one get started? We’ll explain all about it in this blog post!

1. What is WebP and why use it?

WebP was developed by Google in an effort to make the web faster. It’s meant to be used as a replacement for JPG, PNG.

The total file size of the average websites consists of about 50% images, so reducing file size of your images can have a big impact on the overall load time as well as scores such as web core vitals.

Google thinks that the benefit of using WebP is so significant that they even suggest using WebP when testing one’s website using their PageSpeed Insights tool.

Google PageSpeed Insights recommends WebP
Google suggests using WebP in their PageSpeed Insights tool.

WebP allows for both lossless and “lossy” compression of images.

Lossless conversion of course means that there will be no loss of image quality whatsoever. However, even the lossy compression using WebP offers virtually no visual difference in terms of image quality, as can be seen in this sample gallery provided by Google.

2. WebP vs JPG: a quick and simple comparison

We also did a simple test ourselves and uploaded 10 different images to a demo page.

The combined size of all images uploaded in JPG format was 4.0MB, as seen below:

Example without WebP
Combined size of images prior to WebP conversion: 4.0MB

After converting all images to WebP using a lossy conversion, the combined size of all images was a mere 2.0MB.

Example with WebP
Combined size of images after converting to WebP: 2.0MB

That’s a 50% reduction in size, and we could see no difference in image quality whatsoever!

3. About WordPress native WebP support

Since WordPress 5.8, there is native support for WebP built-in to WordPress itself.

To use it, one can simply upload images in WebP format to the media library, just like with the more traditional image formats.

Native WebP support in WordPress
Since WordPress 5.8, it’s possible to upload .webp files directly in WP Admin

This approach requires you to convert your images to WebP prior to uploading them to WP. To do that, there are several handy conversion tools available online.

It’s that simple to use WordPress built-in support and start uploading WebP to your site.

One should note however that browser support for WebP is still not 100%, so as of today we would recommend to make sure you have a fallback in place.

4. Serving WebP with fallback

WebP is a rather new file format and although it’s today supported by all major browsers, visitors using older browser versions won’t be able to see WebP images, unless we use a fallback. For an up-to-date overlook at the browser support for WebP, please take a look at caniuse.com.

For better backwards compatibility and to be able to support visitors using older browsers, we would recommend uploading your images to WordPress in JPG and PNG format, like you normally would, and later convert them to WebP after uploading.

Even though WebP is now natively supported by WordPress, browser support is still at ~95%. For now we would still recommend the conversion approach since it allows for a fallback for visitors with older browsers.

By doing this, your site can serve images “dynamically” and only serve WebP images to visitors who support it, and fall back to the original PNG/JPG version for visitors with older browsers.

All the popular WebP plugins (including the ones listed below) has this fallback feature built-in, and is easy to configure.

5. Serving WebP in WordPress using a plugin

For most WordPress site owners, the easiest way to convert all images to WebP and start serving them to your visitors, will be to use one of many of the available plugins for this.

There are several plugins available for WordPress that let you convert all your JPG and PNG to WebP, some are free and some paid options exists as well.

Some of the most popular options are:

  • WebP Express (Free and unlimited)
  • Imagify (Freemium model, 20MB of images can be converted for free every month)
  • ShortPixel (Freemium model, 100 images per month can be converted for free)
  • Smush (WebP conversion only available in the paid “Pro” version)


WebP conversion using WebP Express
Converting images to WebP Express, or other plugins, is easy and straight forward.

Please note that besides converting your images to the WebP file format, you will also have to configure your web server in order to serve them to your visitors.

For Apache environments, your .htaccess file should be updated automatically and it should work out-of-the-box. For nginx hosting environments, manual configuration is needed, so you may have to ask your host to help out. Here on Templ, this service is of course included for free as a part of our managed hosting.

Using a plugin is for the most part easy and straightforward, but using a plugin has its drawbacks since installing additional plugins on your site means that more code needs to be run on each page load, which slows down the site, and conversion to WebP through PHP is not exactly ideal.

6. Serving images in WordPress WITHOUT plugin

Ideally then, we would want to serve images in WebP format without relying on a plugin for WordPress to make it happen.

This would give us the best of both world; we would be able to serve WebP and speed up our website, and wouldn’t have to add more code to our website and thus slowing down the backend.

If you are hosting your website on a VPS or have other non-managed hosting for yours site however, this is rather technical to do and you would likely have to do it all by yourself. A good starting point in those cases would be the official documentation on how to convert images on different operating system.

If you are using a managed hosting provider on the other hand, your host just might be able to help you out and setup this for you.

Here on Templ for example, we offer conversion of images to WebP, including all the necessary server configuration, all included for free with all our plans.

7. Summary

All in all, it’s clear to say that the benefit of using WebP on your site can be significant and when using fallbacks we don’t see any drawbacks either.

There is a good reason Google’s PageSpeed Insights recommends you to “serve images in next-gen formats”.

We would recommend anyone to start looking into WebP conversion and start using it on your website as soon as possible.

If you have any questions about WordPress and WebP images then you are welcome to ask us in the chat here on this page or to post in the comment box below.

Good luck! 🙂

Bezpieczeństwo WordPress – 13 prostych kroków do poprawy bezpieczeństwa

Jeśli chodzi o bezpieczeństwo WordPress, to normalne, że wiele osób po prostu instaluje wtyczkę bezpieczeństwa i sądząc, że wszystko zostało załatwione oraz myśląc, że ich witryna jest teraz całkowicie bezpieczna.

Jednak wtyczka poprawiająca bezpieczeństwo często powoduje, że Twoja witryna staje się bardzo powolna no i nie jest kompletnym rozwiązaniem bezpieczeństwa oraz może dawać nam również fałszywe poczucie bezpieczeństwa.

Twoja witryna jest tak samo bezpieczna, jak jej najsłabsze ogniwo, dlatego ważne jest, aby wziąć pod uwagę cały obraz i spróbować poprawić jak najwięcej aspektów bezpieczeństwa.

W tym artykule zebraliśmy listę różnych środków zaradczych, które każdy może łatwo wdrożyć oraz które mogą znacznie poprawić bezpieczeństwo Twojej witryny.

Czy WordPress jest bezpieczny?

Tak! w istocie WordPress jest bardzo bezpieczny, ale w dużej mierze ponosisz sam odpowiedzialność za to, jak bezpieczna będzie Twoja strona internetowa.

WordPress ma bardzo rygorystyczną kontrolę jakości i bezpieczeństwa oraz można często bardzo szybko naprawiać wszelkie wykryte luki. Oznacza to, że jeśli jesteś w stanie aktualizować instalację WordPress, istnieje bardzo małe ryzyko, że Twoja witryna zostanie kiedykolwiek „zhakowana” z powodu WordPress.

Najczęstszym powodem włamań do witryny internetowej jest to, że administrator w jakiś sposób zaniedbał zabezpieczenia i nie zastosował się do wszystkich dostępnych porad dotyczących zapewnienia bezpieczeństwa dla swojej witryny.

Haker WordPress?

1 – Aktualizuj WordPress, wtyczki i motywy

Najważniejszym środkiem bezpieczeństwa, jaki możesz podjąć, jest aktualizowanie WordPress, wtyczek oraz motywów.

Ponieważ WordPress jest projektem open source, każdy może przeczytać cały podstawowy kod, a także pomóc go ulepszyć, co oczywiście ma wiele zalet. Ale oznacza to również, że hakerzy i inne osoby o złych zamiarach mogą odczytać kod i znaleźć luki w zabezpieczeniach oraz wykorzystać je do przejęcia kontroli nad witrynami innych osób.

Za każdym razem, gdy do zespołu odpowiedzialnego za WordPress zostanie zgłoszona luka w zabezpieczeniach, możesz być pewien, że aktualizacja zabezpieczeń zostanie opublikowana tak szybko, jak to tylko możliwe.

Oznacza to, że jeśli nie korzystasz z najnowszej wersji WordPress, najprawdopodobniej użyjesz wersji, która zawiera jedną lub więcej znanych luk w zabezpieczeniach. Hakerzy mogą z kolei wyszukiwać strony internetowe ze starym oprogramowaniem i przeprowadzać na nie ukierunkowane ataki.

Dlatego niezwykle ważne jest, aby aktualizować WordPress, motywy i wtyczki tak często, jak to tylko możliwe.

Aktualizacja strony internetowej może być czasami trochę przerażająca, zwłaszcza jeśli jest to witryna e-commerce, ale często lepiej jest, gdy spowodujesz trochę przestoju z powodu złej aktualizacji (pod warunkiem, że masz kopię zapasową), niż ktoś nieuprawniony uzyska dostęp, ponieważ zna luki w zabezpieczeniach.

Rdzeń, wtyczka i motywy WordPress są aktualne. Dokładnie tak, jak chcesz je mieć.

Automatyczne aktualizacje
W WordPress 3.7 wprowadzono automatyczne aktualizacje, które umożliwiają automatyczne instalowanie drobnych aktualizacji i poprawek bezpieczeństwa WordPress na Twojej stronie internetowej.

Możesz także aktywować automatyczne aktualizacje motywów i wtyczek, dodając następujący kod do pliku functions.php motywu:

 add_filter( 'auto_update_plugin', '__return_true' );
add_filter( 'auto_update_theme', '__return_true' );

Najpierw zweryfikuj aktualizacje w środowisku testowym
W przypadku niektórych bardziej krytycznych dla systemu witryn, które absolutnie muszą być cały czas aktywne i nie powinniśmy ryzykować ich awarii z powodu aktualizacji, która się nie powiodła, dobrym pomysłem jest zawsze najpierw aktualizować na stronie testowej i sprawdzać, czy aktualizacje działają tam poprawnie przed aktualizacją właściwej strony internetowej.

W ten sposób możesz mieć pewność, że podczas aktualizacji Twojej aktywnej witryny nie pojawią się żadne niespodziewane problemy.

2 – Odinstaluj nieaktywne wtyczki i motywy

Powszechnym błędnym przekonaniem, które większość osób ma, jest to, że nieaktywne wtyczki nie mogą mieć żadnego negatywnego wpływu na witrynę, ale faktem jest, że haker może wykorzystać znane luki nawet w wtyczkach i motywach, które są nieaktywne.

Ponadto, jeśli masz zainstalowane wtyczki na swojej stronie, których nie używasz, łatwo jest zapomnieć o ich aktualizacji, co oczywiście może oznaczać dodatkowe zagrożenie bezpieczeństwa.

Dlatego zalecamy, aby zawsze utrzymywać liczbę wtyczek na jak najniższym poziomie i odinstalowywać wtyczki, których nie używasz, ponieważ ich dezaktywacja nie wystarczy.

3 – Użyj właściwych (restrykcyjnych) uprawnień do plików

Uprawnienia do plików określają, kto i co może czytać, pisać i modyfikować w plikach tworzących WordPress, a także we wszystkim, co zainstalowałeś w WordPress. Jeśli Twoje pliki nie mają najsurowszych możliwych uprawnień, hakerzy mogą łatwiej modyfikować pliki i atakować Twoją witrynę.

Uprawnienia do plików są zwykle określane w postaci 3 cyfr, np. 755, gdzie każda cyfra reprezentuje grupę użytkowników i do czego ta grupa ma uprawnienia.

Pierwsza grupa od lewej to prawa „użytkownika” (lub „właściciela”), druga to prawa „grupy”, a trzecia to prawa „innych”.

W uproszczeniu można powiedzieć, że im wyższa liczba, tym więcej uprawnień ma użytkownik. Dla zainteresowanych, oto wyjaśnienie, co tak właściwie oznaczają poszczególne liczby:

4 = odczyt (r)
2 = zapis (w)
1 = wykonanie (x)
0 = brak uprawnień (-)

Odczyt + zapis + wykonanie = 7
Odczyt + zapis = 6
Odczyt + wykonanie = 5

Wszystkie foldery powinny mieć 755 lub 750.

Wszystkie pliki powinny mieć 644 lub 640, z wyjątkiem wp-config.php, który powinien mieć 440 lub 400, aby uniemożliwić innym dostęp do niego.

Żaden folder nie powinien być ustawiony na 777, co daje wszystkim użytkownikom pełne prawa. Nigdy nie powinno być to konieczne, ponieważ proces PHP jest uruchamiany przez właściciela pliku, a zatem może pisać w folderach z 755.

Ścisłe uprawnienia do plików są bardzo ważne w środowisku „współdzielonego hostingu”, w którym udostępniasz serwer nieznajomym, aby zapewnić, że inni użytkownicy na serwerze nie będą mieli dostępu do twoich plików.

Jak zmienić uprawnienia do plików?

Zmiana uprawnień do plików jest łatwa i można to zrobić za pomocą prawie każdego klienta FTP, takiego jak bardzo popularny i darmowy klient FTP FileZilla.

Aby zmienić uprawnienia do plików w FileZilla, kliknij prawym przyciskiem myszy plik lub folder, dla którego chcesz ustawić uprawnienia, i naciśnij „Uprawnienia do plików…”

HJak zmienić uprawnienia do plików w FileZilla?

4 – Wyłącz wbudowany edytor plików

Czy wiesz, że WordPress ma wbudowany edytor plików dla motywów i wtyczek? Ułatwia edycję plików w witrynie bezpośrednio w WP Admin, co dla niektórych może być wygodne, ale może również stwarzać pewne ryzyko.

Gdy edytor plików jest włączony, administratorzy mogą edytować kod w motywach i wtyczkach bezpośrednio w przeglądarce. Stanowi to potencjalne zagrożenie bezpieczeństwa, ponieważ możesz łatwo popełniać błędy, które spowodują, że cała strona przestanie działać po wprowadzeniu zmian, a także zapewnia hakerom szybki dostęp do wszystkich plików, które składają się na Twoją witrynę.

Zalecamy całkowite wyłączenie tego wbudowanego edytora plików i edycję za pomocą plików przez SFTP.

Wbudowany edytor plików można łatwo wyłączyć w wp-config.php, dodając następujący fragment kodu:

define( 'DISALLOW_FILE_EDIT', true );

Wbudowany edytor plików w WordPress, który zalecamy wyłączyć

5 – Ustaw niestandardowy prefiks bazy danych

WordPress używa prefiksu przed wszystkimi tabelami w bazie danych, którym domyślnie jest wp_.

Niektóre ataki na bazę danych zakładają ten konkretny prefiks, więc jeśli zamiast tego użyjesz innego prefiksu, możesz chronić swoją witrynę przed niektórymi atakami.

Liczba ataków, które zakładają domyślny prefiks, prawdopodobnie nie będzie duża, a zmiana prefiksu w istniejącej instalacji WordPress nie jest całkowicie wolna od ryzyka. Dlatego zalecamy wybór innego prefiksu tylko wtedy, gdy zamierzasz skonfigurować nową instalację WordPress i nie zmieniać prefiksu na istniejącej stronie.

Rozsądne może być użycie prefiksu bazy danych innego niż domyślny wp_

6 – Używaj silnych nazw użytkownika oraz haseł

Jednym z najczęstszych sposobów, w jaki haker dostaje się na stronę internetową, jest „zgadywanie” hasła.

Jeśli używasz prostych i powszechnie używanych haseł, możliwe jest, że nieupoważnione osoby z łatwością uzyskają dostęp do Twojej witryny poprzez tzw. atak brute-force, w którym atakujący podaje dużą liczbę różnych haseł tak długo, aż się dostanie na stronę. Jeśli użyjesz silnego hasła, taki atak będzie w rzeczywistości niemożliwy do zrealizowania.

Używanie silnych haseł może niektórym wydawać się oczywiste, ale wciąż jest wielu osób, które używa bardzo słabych haseł. Firma zajmująca się bezpieczeństwem SplashData co roku opracowuje listę najpopularniejszych haseł. 5 najczęstszych haseł w 2019 roku to:

  1. 123456
  2. 123456789
  3. qwerty
  4. password
  5. 1234567

Upewnij się, że używasz długiego i złożonego hasła, które jest generowane losowo i najlepiej wyłącznie dla Twojej witryny.

Często zdarza się również, że niektórzy używają nazwy użytkownika „admin” na swoim koncie administratora. Zamiast tego, dla dodatkowego bezpieczeństwa, zaleca się użycie innej nazwy użytkownika, co jeszcze bardziej utrudni hakerowi odgadnięcie prawidłowej nazwy użytkownika oraz hasła.

Hasła powinny być długie i najlepiej niepowtarzalne

7 – Zmień klucze bezpieczeństwa w wp-config.php

Klucze bezpieczeństwa WordPress to zbiór losowo generowanych zmiennych, które pomagają poprawić szyfrowanie danych przechowywanych w plikach cookie odwiedzających i administratorów.

Istnieją cztery różne klucze bezpieczeństwa: AUTH_KEY, SECURE_AUTH_KEY, LOGGED_IN_KEY i NONCE_KEY.

Po zainstalowaniu WordPress są one generowane losowo oraz są unikalne dla Twojej witryny. Jeśli jednak kiedykolwiek przeniosłeś się z jednego hosta internetowego na drugiego lub przejąłeś swoją witrynę po innym właścicielu, dobrą praktyką może być wygenerowanie nowych kluczy bezpieczeństwa.

Można je łatwo wymienić w dowolnym momencie, ale oznacza to, że każdy, kto jest zalogowany do Twojej witryny, zostanie wylogowany.

Możesz łatwo uzyskać kolekcję nowo wygenerowanych kluczy bezpieczeństwa za pomocą inteligentnego narzędzia na WordPress.org, a następnie wkleić je do wp-config.php.

Najlepiej wymienić klucze bezpieczeństwa w wp-config.php po przeniesieniu od jednego hosta do drugiego

8 – Wyłącz XML-RPC

XML-RPC to funkcja WordPress, która była wcześniej używana do komunikacji między WordPress a niektórymi innymi systemami, takimi jak inne sieci blogowe. Jednak w ostatnich latach funkcja została osłabiona, ponieważ jej użycie stale spada, a w przyszłości planuje się jej całkowite usunięcie i zastąpienie własnym API WordPress.

Obecnie rzeczywiste przypadki użycia XML-RPC są dość nieliczne. Zamiast tego stał się popularnym „narzędziem” dla hakerów, ponieważ umożliwia testowanie setek kombinacji haseł za pomocą jednego polecenia.

Jeśli używasz Templ jako hosta internetowego, wtedy XML-RPC jest już wyłączony od samego początku, a jeśli używasz innego hosta internetowego, stosunkowo łatwo jest wyłączyć tę funkcję w inny sposób.

Możesz wyłączyć XML-RPC za pomocą wtyczki lub wkleić kod do pliku functions.php motywu:

add_filter( 'xmlrpc_enabled', '__return_false' );

.. lub jeszcze lepiej jest wyłączyć go za pomocą .htaccess:

<Files xmlrpc.php>
order deny,allow
deny from all
</Files>

9 – Ukryj wersję WordPress, której używasz

Wersja WordPress, która jest używana w Twojej witrynie, jest zwykle widoczna w kodzie HTML Twojej witryny, więc jeśli masz starą wersję WordPress ze znanymi lukami, haker może bardzo łatwo uzyskać dostęp do tych informacji.

Chociaż oczywiście zalecamy, aby zawsze uruchamiać najnowszą wersję WordPress, nadal dobrą praktyką może być ukrycie numeru wersji dla odwiedzających. Im mniej osób postronnych wie o Twojej instalacji WordPress, tym trudniej jest przeprowadzić ukierunkowane ataki.

Łatwo ukryć wersję WordPress za pomocą małego kodu w functions.php:

function wp_version_remove_version() {
return '';
}
add_filter('the_generator', 'wp_version_remove_version');

Wersja WordPress, której używasz, jest widoczna w kodzie HTML, jeśli jej nie ukryjesz

10 – Używaj SSL i HTTPS

Chociaż SSL stał się obecnie czymś powszechnym, nie zaszkodzi po raz kolejny podkreślić znaczenie SSL, jeśli chcesz mieć bezpieczną stronę internetową.

Z certyfikatem SSL możesz używać szyfrowanego protokołu HTTPS zamiast starego i niezaszyfrowanego HTTP. Oznacza to, że gdy wypełnisz na przykład formularz logowania na stronie z protokołem HTTPS, informacje, w tym hasła i inne poufne informacje, są szyfrowane, co uniemożliwia podpatrzenia ich przez nikogo innego.

Chociaż największą zaletą SSL jest bezpieczeństwo, obecnie jest również silnie związana z korzyściami płynącymi z SEO (ponieważ Google oraz inni producenci preferują HTTPS od HTTP) oraz zwiększonym zaufaniem odwiedzających.

Posiadanie certyfikatu SSL i prowadzenie witryny przez HTTPS jest czymś co jest konieczne.

11 – Zmień WP Admin URL

Wszystkie witryny WordPress początkowo używają jednego i tego samego adresu URL dla WP Admin, a mianowicie example.com/wp-admin. Jednym z potencjalnych problemów jest to, że wszyscy wiedzą o tym adresie, w tym boty i hakerzy.

Zmieniając adres URL na WP Admin, możesz uczynić witrynę mniej podatną na ataki.

Możesz łatwo zmienić adres WP Admin, korzystając z wtyczki WPS Hide Login plugin. Szczegółowy opis, jak to skonfigurować, znajduje się w innym poście na blogu.

Pamiętaj, że nie jest to rozwiązaniem wszystkich problemów, ale z pewnością może utrudnić hakerom dostęp do Twojej witryny.

TAdres URL WP Admin można łatwo zmienić za pomocą wtyczki WPS Hide Login

12 – Upewnij się, że wykonujesz codzienne kopie zapasowe

Tworzenie kopii zapasowej witryny nie jest oczywiście działaniem, które chroni ją przed jakimkolwiek atakiem, ale z drugiej strony jest absolutnie nieocenione na wypadek jakieś katastrofy i musisz „cofnąć wszystko”, aby uratować swoją stronę internetową.

Bez względu na to, jakie środki zapobiegawcze podejmiesz, Twoja witryna nigdy nie będzie w 100% bezpieczna. Dlatego zawsze należy dbać o to, aby kopie zapasowe swojej witryny były wykonywane na bieżąco.

Większość firm hostingowych w segmencie premium codziennie wykonuje kopie zapasowe wszystkich stron internetowych, podobnie jak my w Templ. W przypadku, gdy Twój hosting nie oferuje automatycznych kopii zapasowych, dość łatwo można to rozwiązać samodzielnie, używając na przykład wtyczki UpDraft, ale powinieneś pamiętać, że wtyczka do tworzenia kopii zapasowych wpłynie na wydajność Twojej witryny i wykorzysta większość przestrzeni dyskowej, za którą płacisz w swoim hostingu.

Zdecydowanie zalecamy codzienne tworzenie kopii zapasowych witryny WordPress

13 – Wybierz bezpieczne rozwiązanie hostingowe

Jeśli chodzi o bezpieczeństwo i WordPress, istnieje wiele czynników, które leżą głębiej niż sama witryna. Istnieje również wiele środków bezpieczeństwa, które należy podjąć na poziomie serwera, za który odpowiada Twój host internetowy. W Templ bardzo poważnie traktujemy bezpieczeństwo i zawsze mamy je na uwadze we wszystkim, co robimy.

Bardzo ważne jest, aby wybrać hosta internetowego, któremu naprawdę możesz zaufać, lub sam posiadasz bardzo dobrą wiedzę na temat bezpieczeństwa, że jeśli zdecydujesz się umieścić swoją witrynę na VPS, sam poniesiesz całą odpowiedzialność za bezpieczeństwo.

Ważne jest również, aby wiedzieć, że różne firmy hostingowe mają bardzo różne zasady dotyczące tego, co robią, gdy witryna zostanie zhakowana. Niektórzy usługodawcy hostingowi po prostu zamykają witryny, które zostały zhakowane i nie chcą o nich wiedzieć, podczas gdy my w Templ oferujemy bezpłatną pomoc w ratowaniu zhakowanej witryny.

Host internetowy, który poważnie traktuje bezpieczeństwo, często ma:

  • Zaporę, która chroni przed różnymi atakami
  • Najnowszą wersję PHP, MySQL oraz innego oprogramowania
  • Codzienne kopie zapasowe
  • Wsparcie dostępne przez całą dobę
  • Całodobowy monitoring wszystkich stron internetowych
  • Oraz szereg innych zaawansowanych funkcji zwiększających bezpieczeństwo

Podsumowanie

Podsumowując, warto powtórzyć, że sam WordPress jest bardzo bezpieczny, ale ważne jest, aby wszystko na bieżąco aktualizować i kierować się zdrowym rozsądkiem.

Należy również pamiętać, że istnieje wiele czynników, które wpływają na bezpieczeństwo witryny, które są „głębsze” niż sam WordPress. Dlatego ważne jest, abyś sam miał bardzo dobre pojęcie o bezpieczeństwie IT lub wybrał hosting, który poważnie traktuje bezpieczeństwo.

Codzienne kopie zapasowe własnej strony internetowej są również absolutną koniecznością, aby mieć na czym się oprzeć w razie poważnego incydentu ze stroną.

Jeśli masz jakiekolwiek pytania dotyczące bezpieczeństwa WordPress, możesz je zadać na czacie tutaj na tej stronie lub opublikować w polu komentarza poniżej.

Powodzenia! 🙂

What is Managed WordPress Hosting?

Managed WordPress Hosting has become increasingly popular in recent years, and according to 451 Research, this form of hosting is expected to grow faster than both shared hosting and VPS hosting in the coming years. If you are wondering if this is the right type of hosting for you, this article will hopefully provide guidance and answers.

What does managed WordPress hosting mean?

Managed WordPress Hosting can be compared to a 5-star hotel, whose exclusive concierge service is available to meet your needs around the clock. You can expect the same luxurious service from Managed Hosting, but instead of getting help with table booking at a trendy restaurant, you get help with creating the best possible conditions for your website.

What is the difference between Managed WordPress Hosting and traditional hosting?

With traditional web hosting, whose service is often called shared hosting, your website is placed on the same server as hundreds of others, which risks leading to downtime and slow loading times, and increases the risk of being hacked. The business idea behind shared hosting is to host as many websites as possible at as low a cost as possible.

shared-hosting

So why are there are so many risks and problems with old, classic web hosts? That your website risks slow loading times and that sometimes even become completely unavailable, is because there are limited resources on the server where the website is located. If one, or more, websites on the server suddenly get a lot of traffic, which leads to the server maximizing its resources, this affects all websites on the server. Only when the traffic has decreased, or when the web hosting staff has upgraded the server’s resources, can you access your website again. An upgrade can, if you are unlucky, sometimes take several hours and who knows what business opportunities you have missed then.

cheap-hosting

If you use Managed WordPress Hosting instead, the website is usually isolated from other websites, or located on a completely separate server. You thus do not risk losing sales because another website on the web host has a temporary traffic peak. And if the website suddenly gets a high load and becomes inaccessible, the web host will usually solve this for you before you even notice it. At Templ, we have monitoring around the clock and check every three minutes that every website is up. If a website goes down, we find the cause and solve the problem for the customer immediately.

The fact that your website runs a greater risk of being hacked at traditional web hosts is because that the website shares an environment with several other websites. If another website on the server has a security hole, there is a risk that the hackers will also access your website. To protect their customers, many web hosts shut down the hacked website as they do not want other websites on the server to be affected. This is of course good for other websites, but for those who have been affected, it can be difficult to get their website up and running again.

The big advantage of shared hosting is the price, which is lower than for Managed WordPress Hosting.

What is the difference between Managed WordPress Hosting and VPS hosting?

Another alternative to Managed WordPress Hosting is to place the website on a so-called VPS (or Virtual Private Server). You then have your own server and can decide for yourself how much resources it should have. You are responsible for optimizing server settings so that the website is both as fast and secure as possible.

vps-server

Buying a VPS is cheaper than Managed WordPress Hosting, but requires you to manage the technology yourself. In other words, you need a lot of knowledge. If you have the knowledge and have a website with high traffic, VPS may be the right choice for you.

What are the benefits of Managed WordPress Hosting?

Servers optimized for WordPress = Fast loading times

Web hosts that offer Managed WordPress Hosting place your website in an environment that is powered by the latest technology and optimized for WordPress. They regularly update their software to the latest versions, and can offer features that help speed up your website:

  • Server-level cache
  • Nginx/Litespeed
  • CDN
  • HTTP2/Quic
  • MariaDB
  • Latest version of PHP

At Templ, Google Cloud’s cloud servers are used, which helps to further reduce websites’ response times.

google-cloud-hosting

WordPress-savvy support

If you enjoy developing your website and adding new features, you will sooner or later encounter challenges that require help. You can find a lot of information online, but it can be time-consuming and difficult to determine if the source is reliable.

If you have access to a support team that has solved thousands of WordPress-related problems, you can count on saving serious time, compared to if you have to find solutions to all problems yourself.

Unlike a traditional web host where there can be thousands of customers per support employee, you also get 5-star service within a few minutes, around the clock.

Higher security

As I mentioned earlier in the article, it is a great advantage that websites are placed in a separate environment, isolated from other websites at the web host. At Templ and other web hosts that offer Google Cloud cloud servers, you can also enjoy the same security structure that Google uses for its services, such as Gmail and Google search.

google-cloud-security

You also get several other features that prevent your website from getting hacked. Some of these are:

  • Latest version of software like PHP and MySQL
  • Free and automatically updated SSL certificates
  • Firewall to protect against attacks

Should your website nevertheless be hacked, you have the option of restoring a backup, as these are taken automatically and placed on a separate server. Templ also offers a so-called “hack guarantee”, which means that we help you clean your website of malicious code and ensure that it works again.

Developer-friendly

Regardless of what your development process looks like, you can count on a web host offering Managed Hosting to assist with all the tools you need to facilitate the work of editing your websites.

developer-friendly-hosting

Among other things, you can expect a large selection of services and integrations, such as SSH, GIT, and WP-CLI. Another popular feature is staging websites, which is perfect for you who want to create a copy of your website and test new features, or new designs before you publish the changes to your live site.

Place your website wherever you want

To deliver a fast website, it’s important to place it in a data center that is close to your visitors. At the time of writing this article (June 2020), you can choose between all 24 of Google Cloud’s data centers, which are located across five different continents.

Easy to scale

If your website has a high load for shorter periods, your allocated resources will be scaled up automatically at no extra cost, to avoid your website becoming slow or even go down. If we notice that you would benefit in the long term from upgrading your plan, or individual resources, we will contact you with recommendations.

Disadvantages of Managed WordPress Hosting

Are there any disadvantages to Managed WordPress Hosting? Yes, there are a couple of disadvantages.

The cost

The price varies from web host to web host, but be prepared to pay between $25 – $30 for the cheapest plan, regardless of which provider you choose. However, the cheapest plan usually goes a long way, and at Templ we have both larger brands with a lot of traffic and online stores that can handle our Small plan which costs $29 per month.

No traditional email service or domain management

As web hosts with Managed WordPress Hosting focus on offering the best hosting solution possible, they rarely provide any traditional webmail or domain registrar, meaning that you likely will have to host your email and buy your domain name elsewhere.

This can of course be a bit daunting for those who want to have everything gathered in one place. At Templ, we help to edit our customer’s domain settings and set up their requested email solution in connection with the migration of the website – all to facilitate the relocation process for the customer as much as possible.

When should you switch to Managed WordPress Hosting?

  • You run an online store and are in need of fast loading times and high reliability
  • You care about your brand and can not risk your website going down due to high traffic, or being hacked
  • You think you can save time if you have access to broad and flexible support that can help you with WordPress-related matters
  • You run a web agency and have customers who appreciate a fast and secure web host
  • Your website has been hacked and you do not trust the security of your current web host

Is Managed WordPress Hosting worth it?

Managed WordPress hosting is a good solution for many, but not for everyone. The more expensive cost means that you have to ask yourself if it’s worth it for you.

If, after reading the article, you see the benefits of Managed WordPress Hosting, and are interested in trying it out, we recommend that you try Templ or some other service for a few months. After the test period, you can evaluate if it’s the right solution for you. You always have the option to pay per month, and can often also test for free for a limited time.

If you want to try Templ for free, you can do so for 10 days, by registering an account here.

WordPress vs Wix: Which platform should you choose?

We hope that by using this guide, you will be able make your choice between these two platforms. Among other things, we will go through the differences between WordPress and Wix, their degree of difficulty, and their price.

In May 2020 WordPress was used by 436 million websites, compared to Wix which in Mars 2020 was used by 3.8 million websites. Using aggressive marketing Wix is growing rapidly and there is a reason for you being here, and why you are considering using their platform for your website. Let us find out if their tool is the right choice for you, or if you should go with WordPress.

What’s the difference between WordPress and Wix?

WordPress is a tool that offers almost endless possibilities. Anyone is welcome to create new functions for their platform, and as a user, you can customize your website any way you’d like. WordPress is a user-friendly platform. But to be able to take advantage of everything being offered, a little bit of knowledge and time is required from the user. However, if you like to create things and enjoy a challenge, you shouldn’t be worried about WordPress difficulty level.

Wix is an all-inclusive solution that includes more kinds of services in its platform, like hosting, domain registrar, and e-mail. At Wix, you can take part in design templates and apps, and also have access to support. Another convenience is that Wix is very user-friendly and doesn’t require any prior knowledge. Two clear disadvantages with the platform are that they, unlike WordPress, will debit you a monthly fee and that your options are fewer.

Difficulty level

The level of difficulty for the two platforms differs slightly, although both may be considered very user-friendly. You can with both platforms use so-called site builders to design your website, which is a comfortable solution if you don’t have any prior knowledge in programming. If you would like to add extra functionality you can in WordPress install one of their 55 000+ plugins and in Wix one of their 300+ apps.

What makes the difficulty level slightly higher in WordPrewss is that their software, plugins, and themes not always are 100 % compatible. This is simply because there are several creators behind their plugins and themes, which can be compared to Wix, who have to approve anyone that wants to contribute.

Are you facing a challenge with your WordPress-website will you nevertheless have access to a great community, and you can among other things, ask for help in different Facebook groups. If you go to Facebook now and search for “WordPress + your country” you will most likely find a local WordPress group you can join.

is-wix-easy

Cost

One of the biggest differences between WordPress and Wix is that Wix costs money. They offer four plans where pricing starts at 4.5 EUR per month. Their cheapest plan is very thin though, and should only be considered if you’re running a small blog.

Are you planning on creating a website you should at least consider the plan “Combo” or the plan “Unlimited”, which cost 8.50 EUR and 12.50 EUR.

Wix also offers three e-commerce plans, but we’re not gonna dig into those in this article.

wix-pricing

What does WordPress cost? WordPress itself is free, but there are some other costs, which you don’t see if you use Wix. For example, you have to pay a recurring fee for web hosting. A web hosting solution that’s equal to Wix, should cost somewhere between 5 USD – 15 USD per month.

So, if you choose a cheap web host, you can get a cheaper monthly cost with WordPress, but if you choose on the basis of quality and you can pay a little more, WordPress will be more expensive than Wix. Here at Templ, we offer a premium web hosting service for WordPress with very extensive support and start at $15 per month.

What’s your goals for your website?

One question you should ask yourself before choosing a platform is; what are my goals for my website?

Is it to look good, be mobile-friendly, appear on Google, and manage to handle a small amount of traffic without it crashing? These are three reasonable goals and the fact is that both WordPress and Wix can help you achieve these. Below we have listed four possible goals and selected the most suitable option for every goal. Hopefully, you have one or more of these goals and can start to lean on which of the platforms to choose.

  • I want my website to load lightning fast – Our suggestion: WordPress. To make your website as fast as possible, you must have the opportunity to choose a good web host, as well as be able to optimize your website as much as possible, which WordPress allows you to do. With Wix, you do not have the opportunity to influence your hosting solution or optimize your website as much as you can in WordPress.
  • I want my website to be easy to maintain – Our suggestion: Wix. With Wix you do not need to update your software yourself, you can leave the website, and expect it to work anyway. If you use WordPress, you should update WordPress and plugins regularly to avoid complications.
  • I want as much traffic as possible – Our suggestion: WordPress. If you have grand plans with your website and actively want to work to get as much traffic as possible, we recommend WordPress. With WordPress, you have the opportunity for more detailed search optimization, which can increase your traffic from search engines. With WordPress, you also have the ability to scale your hosting solution and ensure that your website continues to load quickly, no matter how many visitors you have.
  • I want to launch my website as soon as possible – Our suggestion: Wix. If you have not worked with WordPress before, Wix has a lower threshold. It’s not at all impossible that you can launch your website within a week if you are active. Getting started with WordPress takes a little longer if you are completely inexperienced, but if you are willing to put add another few weeks into it, WordPress is also a good option for you.

when-choose-wordpress

When should you choose WordPress?

  1. You like to have many options and don’t want to be locked into a limited selection of features and design templates
  2. You want to make your website as fast as possible
  3. You have high ambitions and want your website to able to receive large amounts of traffic

When should you choose Wix?

  1. You are eager to get started and want to launch your website as soon as possible
  2. You have no prior knowledge of WordPress or programming
  3. You want a time-efficient solution that you don’t have to maintain

Final words

Both WordPress and Wix are good choices for anyone who wants to create their first website, whether it is for private use, or if it is a business site. We hope that, after reading this guide, you have enough flesh on your bones to make your choice.

If you have questions about any specific functionality or would like to check out other things with us, you are more than welcome to leave a comment or write in our chat. Good luck now!

Squarespace vs WordPress – What to Know Before You Choose? (Pros and Cons)

With a pandemic as the present enemy, plenty of ventures have begun to go online, whether it’s a store that’s starting to explore avenues in e-commerce or a business seeking to establish their online presence now more than ever.

While COVID-19 persists and calls for the adoption of digital methods such as going online and building a website, companies often fail to pay attention to choosing the platform they wish to work with. Keep in mind that this is integral to create a well-rounded website.

Luckily, there are plenty of choices that are accessible to anyone who wishes to build a website even if you aren’t an expert. Among the popular options include Squarespace and WordPress. Both make stunning sites, so there’s no surprise that you’re considering these two platforms.


To begin with the basic differences, Squarespace is known as a website builder with designer templates that boast top quality. Squarespace supplies hosting, so there’s no need for a hosting provider. There’s also no need to code, but an option to do so is available.

Meanwhile, WordPress is a content management system with more in-depth capabilities that enable you to customize and expand your website when it comes to technological aspects. It’s better for creators who like to build outside the box when it comes to accomplishing their objectives.

These two builders are both efficient and sophisticated, but with the life-changing transformation the pandemic has ushered in our lives, we think it’s best to take time to appraise these popular picks with a Squarespace vs WordPress post and prove which one is a better fit for your business. We have this list of pros and cons for each platform to give you a clear idea on which works best for you.

Squarespace

Pros

  1. You don’t have to be an expert
  2. As we go on about Squarespace vs. WordPress, we have to highlight one of the best aspects the former option boasts. When it comes to creating a website via Squarespace, you don’t need to be an expert or a web developer. You can easily construct a site without the need for knowledge on coding and technicalities.

    When designing a website, you can simply sign up and count on Squarespace to supply you with a stunning template. That’s what the platform is known for. You can customize your site even further with drag-and-drop functionalities to move and arrange certain aspects of your page.

    Although it might take a while for you to learn the ropes when setting up your site, Squarespace is ideal for professionals and non-professionals alike, making it a perfect option for anybody who wishes to establish their presence online.

  3. Community support and additional knowledge are always welcome
  4. Because it’s a platform that welcomes all levels of expertise, Squarespace offers free video tutorials and has a special answer section to cater to your inquiries. The latter supplies a response to frequent asks about creating a site on the platform, which can be further enriched by looking to the Squarespace community via forums.

    If you’re also unhappy with your web design, you can hire a Squarespace specialist to develop your website. They can resolve issues you run into your page and offer you a more bespoke site that addresses your business needs.

  5. Great-looking design for image heavy users
  6. If you’re planning to show off product photos or if your company offers services related to photography, then in the battle of Squarespace vs WordPress, the former officially wins.

    The biggest advantage of using Squarespace lies in the clean layouts and beautiful designs it offers, which are particularly great for users who plan to use a lot of images when creating a website. Best of all, unlike WordPress with its bloated plugins with poorly inputted codes, you can trust on site loading times of Squarespace sites.

Cons

  1. Limited eCommerce functions
  2. Although Squarespace is alright with eCommerce, the platform is pretty limited if your goal is to set up an online store. When compared to WordPress’s roster of payment gateways, you’ll begin to ask is Squarespace worth it, since you can only select from three options: Stripe, PayPal, and Apple Pay. Limited payment options can set you back as an online retailer and hinder your goal to drive more sales, so think twice about it.

    Squarespace also doesn’t have a similarly broad array of plugins that WordPress has for eCommerce sites. On top of that, it charges a 2 to 3% transaction fee plus credit card processing fees, so it can weigh a lot on your pocket, especially if you’re avoiding these additional charges.

WordPress

Pros

  1. Best for eCommerce
  2. Since we’re discussing the advantages and disadvantages of WordPress, it’s best to kick off with the platform’s capabilities when it comes to transforming your website into an eCommerce store. WordPress has a good number of plugins such as WooCommerce that are capable of getting you to this outcome. There are also other available plugins and methods that boost your online shop’s capacities, if you’re looking to speed up WooCommerce.

    Unlike Squarespace, you don’t have to pay any transaction fees besides what your payment processor demands. You can also incorporate a plugin catering to affiliate marketing, which is useful after Forbes predicted its bright future in the coming years.

    This is echoed by data from Statista, which shows that affiliate marketing expenditure will go beyond $ 8 billion by 2022.

  3. There’s a plug-in for everything
  4. When talking about the pros and cons of WordPress hosting, it’s important to emphasize that the platform is open-source, which means that anybody can set up plugins that broaden the core functionality of WordPress itself.

    Plugin development is ruled by supply and demand, so if your site needs something particular, chances are a user has already constructed a plugin for it.

  5. WordPress is widely used
  6. According to WordCamp, WordPress is currently powering 75 million sites online. That’s a staggering number of users relying on the most popular content management system to date.

    Because of this, you can be sure that you’re not tied down to a single developer since plenty of them are familiar with the platform. Likewise, once you’re good to go with your website, it’s easy to find staff to manage, operate and maintain it because of WordPress’s popularity.

Cons

  1. Additional software is sometimes necessary

Although WordPress is a popular choice and continues to grow through the years, it still needs some additional tweaks if you’re looking to establish a professional website. While it already offers much, you simply can’t rely on WordPress’s plugins and templates. Most organizations with a professional site incorporate extra software that can keep up with the times.

Aside from paying for your WordPress hosting, you have to also purchase this software and renew subscriptions to maintain your site’s functionality. This option can set you back when it comes to budget, but we also think that investing in solutions can boost your enterprise online.

For instance, if you think what WordPress has is not enough, you can weigh the pros and cons of a website builder software to see if it helps.

Go get your dream website

Now that we’ve reached the end of our Squarespace vs WordPress debate, we hope we’ve given you enough enlightenment on which platform to use for your venture. Both platforms have their own sets of advantages and disadvantages as well as strengths for particular enterprise and individual needs.

Despite all this, we think that WordPress is still a more robust option, since it offers better value, more powerful capacities and more support than Squarespace. Additionally, more users online prefer to use WordPress, so you can be sure about its reliability.

With WordPress, you can get a custom domain, round-the-clock support alongside a friendly creative community that’s there to guide you with every step of the way as you build your business online.

How to prevent WordPress from adding <p> tags in page content

One of the things that initially made WordPress into the hugely popular CMS that it is today was its ease of use.

But some of the conveniences that WordPress comes with is not always desirable, like the fact that WordPress automatically adds <p> (paragraph) tags to content.

Here on Templ.io for example, we don’t use any page builder or WYSIWYG to construct our pages. Instead, all of our pages are made up of very precise and manually written HTML markup, and in our case it was a pain in the *** when WP automatically added <p> all over our page content, which sometimes screwed up our page designs completely.

Luckily, we managed to disable this functionality by adding a small code snippet to our theme’s functions.php file.

We wanted to keep the automatically added <p> tags in our blog posts, but remove them from our pages. Here is the code that we use:

// Prevent WP from adding <p> tags on pages
function disable_wp_auto_p( $content ) {
  if ( is_singular( 'page' ) ) {
    remove_filter( 'the_content', 'wpautop' );
    remove_filter( 'the_excerpt', 'wpautop' );
  }
  return $content;
}
add_filter( 'the_content', 'disable_wp_auto_p', 0 );

If you instead wish to prevent WordPress from adding <p> tags on both pages, posts and all other post types, you can simply remove the if ( is_singular( 'page' ) ) statement, like this:

// Prevent WP from adding <p> tags on all post types
function disable_wp_auto_p( $content ) {
  remove_filter( 'the_content', 'wpautop' );
  remove_filter( 'the_excerpt', 'wpautop' );
  return $content;
}
add_filter( 'the_content', 'disable_wp_auto_p', 0 );

If you want to prevent WP from adding <p> tags to any other post type, you can simply replace page in if ( is_singular( 'page' ) ) with your post type of choice.

Smart, huh?

Have you found any other smart way to apply this code, or if you have some other neat little WordPress tweak to share? Please feel free to leave a comment below.